Configure Settings: Head Contracts
Objective
To configure the advanced settings for the project's Head Contracts tool.
Background
When setting up a Procore project, a user with 'Admin' permission on the Head Contracts tool will first use the steps below to configure the tool's settings for users of the tool. Because users can create a single head contract or multiple head contracts on a single project (see Create Head Contracts), the settings listed below are applied globally to all of the head contracts in a project:
- Contract Configuration. Define the number of head variation tiers for the project, gives you the option to grant users with 'Standard' permission on the Head Contracts tool, the privilege to create potential variations and the ability to choose if you want to make the Schedule of Values (SOV) editable.
- Default Distributions. Specify the users to include by default on the Head Contracts tool's email notification distributions.
- Funding Sources. List any funding sources related to the head contract. A funding source can include federal, state and local funds, bonds, grants, tax revenue, loans, programs and more.
You can also set up customised settings to apply to each head contract that your users create in a single project. To learn more, see Edit the Advanced Settings on a Head Contract.
Things to Consider
- Required User Permissions:
- 'Admin' level permissions on the project's Head Contracts tool.
- 'Admin' level permissions on the project's Head Contracts tool.
- Additional Information:
- Additional settings for a project's head contract are in the tool's Advanced Settings tab. See Edit the Advanced Settings on a Head Contract.
Prerequisites
- Determine the number of variation tiers that you want to apply to your project. To learn more, see What are the different variation tier settings in Project Financials?
Steps
- Navigate to the project's Head Contracts tool.
- Click the Configure Settings
 icon.
icon. - Under Contract Configuration, do the following:
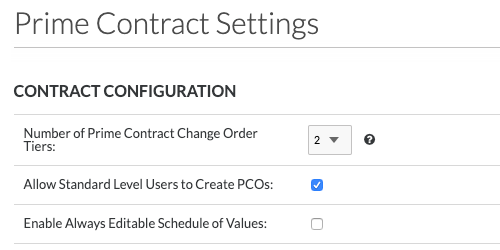
- Number of Head Contract Variation Tiers
Select one option from the drop-down list to define how variations will be managed on the project:Important
This setting cannot be changed after the first variation is created on the project.- 1. A one (1) tier variation configuration requires users to create only Head Contract Variations. See Create a Head Contract Variation.
- 2. A two (2) tier variation configuration gives users the ability to create potential variation (see Create a Potential Variation for a Head Contract) that can then be grouped into a single Head Contract Variation) and sent to a user for approval. This is the default setting for Procore projects.
Notes
- A three (3) tier variation configuration is also available. To learn more, see What are the different variation tier settings in Project Financials?
- If your company or project billing process does NOT require you to group all of the approved variations for the month into a single, combined variation for final signature, Procore recommends configuring the two-tier variation configuration setting on the Head Contracts tool.
- Allow Standard Level Users to Create PVs
Place a mark in this checkbox to grant users with 'Standard' permissions the ability to create a PV on the Variations tab of a Head Contract.
Note: If you clear the mark from the checkbox, only users with 'Admin' permission can create a PV using the Variations tab of a Head Contract. - Enable Always Editable Program of Values
Mark this checkbox to provide users with editing permissions the ability to add, update and remove line items from the SOV when the contract is in any status. Clear the mark to restrict users from editing the schedule of values. This setting is turned OFF by default. To learn more, see What is the 'Enable Always Editable Schedule of Values' setting?Note
For Procore users who turn the 'Enable Always Editable Schedule of Values' setting ON, only a select number of integrated ERP systems support a one-directional sync from the integrated ERP system to Procore's Head Contracts tool. Updating a head contract's line items when its data is being synced with an integrated ERP system is NOT recommended.
- Number of Head Contract Variation Tiers
- Under Contract Dates, users who have been granted 'Admin' level permissions on the company's Admin tool can click the Contract Fieldsets page in the Company Admin Tool link in the BLUE informational banner pictured below.

Note
The 'Contract Dates' section has been moved to the 'Fieldsets' tab in Company level Admin tool. To learn how to create fieldsets, see Create New Configurable Fieldsets. - Under Contract Progress Claim Settings, choose one of these options:
- Place a mark in the Show Markup on Progress Claim PDF and CSV check box. This setting configures the Head Contracts tool to show financial markup by default on all PDF and CSV progress claims.
OR - Remove the mark from the Show Markup on Progress Claim PDF and CSV check box. This setting configures the Head Contracts tool to hide financial markup by default on all PDF and CSV progress claims.

- Place a mark in the Show Markup on Progress Claim PDF and CSV check box. This setting configures the Head Contracts tool to show financial markup by default on all PDF and CSV progress claims.
- Under Default Distributions, select a person from each drop-down list.
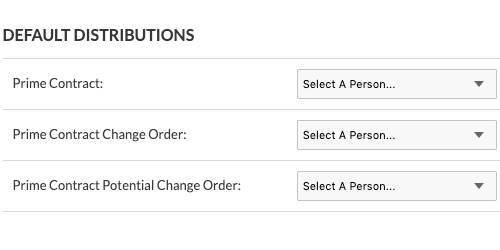
- Head Contract. Select default distributions to be included in communication regarding the head contract. This can be people who need to review the head contract before it is approved.
- Head Contract Variation. Select default distributions to be included in communication regarding Head Contract Variations.
- Head Contract Variation Request. Select default distributions to be included in communication regarding Variation Requests for head contracts.
- Head Contract Potential Variation. Select default distributions to be included in communication regarding Head Contract Variations.
- Click Update.
- Under Funding Sources, create a list of funding sources for your project. A funding source can include federal, state and local funds, bonds, grants, tax revenue, loans, programs and more. See Create Multiple Head Contracts.

- Name. Enter the name of a funding source in the box.
- Description. Enter a description of the funding source in the box.
- Click the plus (+) sign to add the line item.
- Click Update.