Edit a Contact in the Project Directory
Objective
To edit a contact in the Project level Directory.
Background
Some of Procore's project tools provide your project team members with the ability to create a 'contact'. In Procore, a contact is a person whose name may be required as part of a data entry value, but does not have a user account to log in to Procore. Examples of contacts include craft workers, temporary labourers or seasonal employees, or site visitors with no affiliation to one of the project's teams. For additional information on contacts in Procore, see What is a 'contact' in Procore and which project tools support the concept?
Things to Consider
- Required User Permissions:
- 'Admin' level permissions on the Project level Directory tool.
OR - 'Read Only' or 'Standard' level permissions on the Project level Directory tool with the 'Update Contacts' granular permission enabled on your permissions template.
- 'Admin' level permissions on the Project level Directory tool.
- Additional Information:
- The 'Contacts' tab is populated with contacts created from one or more projects' Incidents and Site Teams tools. If your company hasn't created any contacts (or doesn't have any projects with either of these tools enabled), the 'Contacts' tab will be empty.
- Contacts can also be edited in the Company level Directory by users with the appropriate permissions. See Edit a Contact in the Company Directory.
- Updating a contact's information in the Project level Directory tool automatically updates the contact's information in the Company level Directory and any project they have been added to.
Steps
- Navigate to the Project level Directory tool.
- Navigate to the Contacts tab.
- Click Edit next to the contact you want to edit.
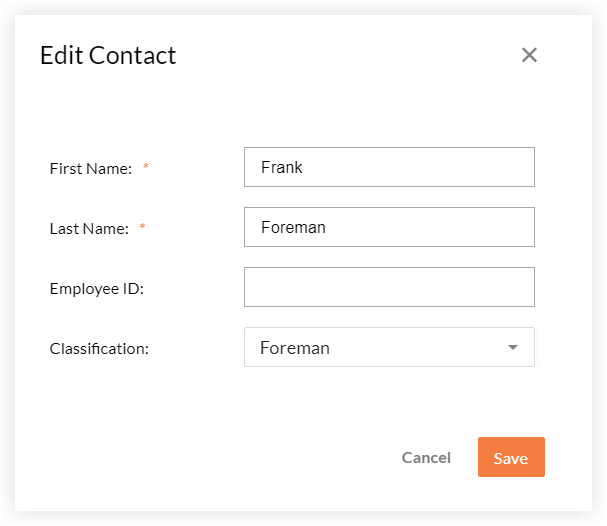
- In the 'Edit Contact' window, the following fields can be edited:
- First Name. Type over the name to make any needed correction.
- Last Name. Type over the name to make any needed correction.
- Employee ID. Optional. Add or edit the contact's Employee ID.
- Classification. Optional. Select a classification for the contact.
Note: This list comes from the Company level classifications. See Add a Classification.

- Click Save.

