Add the Columns for Job Cost Transaction Syncing to a Budget View for ERP Integrations
Important
The steps below are designed to be used by Procore customers integrated with supported ERP systems who want to import job cost transaction data created in their ERP system into Procore.Objective
To update the Procore ERP Budget view with the recommended source columns for the ERP job cost transaction syncing feature.
Background
In Procore, a budget view defines the data column layout in the Budget tab of a project's Budget tool. By default, the Procore web application provides users with four (4) budget views that you can (1) use as-is or (2) customise to suit your company's specific needs. You can also create additional views, if needed. For instructions, see Set up a New Budget View.
Each budget view in Procore includes a unique set of columns designed to help your project users see the data that you want to see in Procore's Budget tool. If you plan to enable the job cost transaction syncing capability for ERP Integrations, you will need to determine which budget view(s) you want to add the recommended columns. Then, you will need complete the steps below on those budget views.
Notes
- The Steps below assume that you want to modify the standard Procore ERP Budget view. These steps as intended to be used as a guideline when modifying other standard budget views or your own customised budget views.
- If you have previously completed the steps described in Add the 'ERP Direct Costs' Column to a Procore Budget View for ERP Integrations, you will need to remove both the existing 'ERP Direct Costs' calculated column and the 'ERP Job to Date Costs' source column on the budget views that you want to modify using the Steps below.
Things to Consider
- Required User Permissions:
- 'Admin' on the Company Admin tool.
AND - Consider utilising the Budget tool's 'View Direct Cost Details' granular permission in your permission templates to control who can and cannot click a value in the 'Direct Costs' column of a budget view to open a popup window that shows job cost transaction detail in the Budget tool. See Grant Granular Permissions in a Permission Template.
- 'Admin' on the Company Admin tool.
- Requirements:
- Enable the ERP Integrations tool on your Procore company account. See Request to Enable the ERP Integrations Tool.
- The following ERP Integrations support this feature:
- Sage 300 CRE®
- Viewpoint® Vista™
- Yardi Voyager®
- Acumatica Cloud ERP
- MRI Platform X®
- Xero™
- Enable these Project Tools:
- Budget Tool. See Add and Remove Project Tools.
- Direct Costs Tool. See Enable the Direct Costs Tool.
- Enable the job cost transaction syncing on your project. See Enable ERP Job Cost Transaction Syncing on a Procore Project.
- Set up the desired budget view(s) for your ERP-integrated project. See Set up a New Budget View and Which budget views should I add to my projects?
- Determine which budget view(s) you want to add the recommended job cost transaction columns. The Steps below assume that you want to modify the standard Procore ERP Budget view. The views you modify might be different.
- If you have previously completed the steps described in Add the 'ERP Direct Costs' Column to a Procore Budget View for ERP Integrations, you will need to remove both the existing 'ERP Direct Costs' calculated column and the 'ERP Job to Date Costs' source column on the budget views that you want to modify using the Steps below.
Steps
- Navigate to the Company Admin tool.
- Under Tool Settings, click Budget.
- Locate the budget view that you want to modify. Then click that budget view in the list. In this example, we will modify the Procore ERP Budget view.
- Under Column Configuration, click Configure Columns.
This opens the 'Configure Columns' window. Continue with the next steps.
Step 1: Add an 'ERP JTD Cost Details' Source Column
The first step is to create an 'Enterprise Resource Planning (ERP) Job to Date (JTD) Cost Details' source column.
- In the 'Configure Columns' window, click Create Source Column.
- Under New Source Column, do the following:
- Column Name. Enter a name for the new column name.
For example, type: ERP JTD Cost Details - Column Source. Select Direct Costs at the source category from the drop-down list.
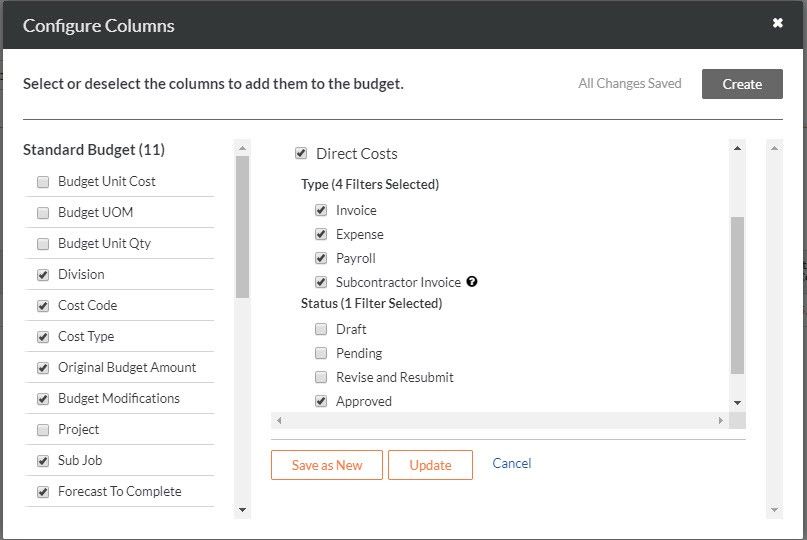
- Direct Costs. Place a checkmark in this box. Then, in the boxes that appear:
- Type. Place a checkmark in the Progress Claim, Expense, Payroll, and Subcontractor Progress Claims boxes.
Note: The Subcontractor Progress Claims checkbox is only visible when:- Your Procore Administrator has enabled the job cost transaction syncing feature for ERP Integrations.
- Job cost transaction syncing is enabled on one (1) project in your company account. See Enable ERP Job Cost Transaction Syncing on a Procore Project.
- Status. Place a checkmark in one or more boxes to limit the details to items in the selected status. In this example, we have selected Approved. However, your choices include: Draft, Pending, Revise and Resubmit, and/or Approved.
- Type. Place a checkmark in the Progress Claim, Expense, Payroll, and Subcontractor Progress Claims boxes.
- Column Name. Enter a name for the new column name.
- Choose from these options:
- If this is a new column, click Create.
- If this is an existing column but want to save the new settings to a new column, click Save as New.
- If this is an existing column and you want to save the new settings, click Update.
Step 2: Add a 'Direct Costs' Source Column
The next step is to create a 'Direct Costs' source column.
- In the 'Configure Columns' window, click Create Source Column.
- Under New Source Column, do the following:
- Column Name. Enter a name for the new column name.
For example, type: Direct Costs - Column Source. Select Direct Costs at the source category from the drop-down list.
- Direct Costs. Place a checkmark in this box. Then, in the boxes that appear:
- Type. Place a checkmark in the Progress Claim, Expense, and Payroll boxes.
Note: Always ensure that you remove the checkmark in the Subcontractor Progress Claims box. - Status. Place a checkmark in one or more boxes to limit the details to items in the selected status. In this example, we have selected Approved. However, your choices include: Draft, Pending, Revise and Resubmit, and/or Approved.
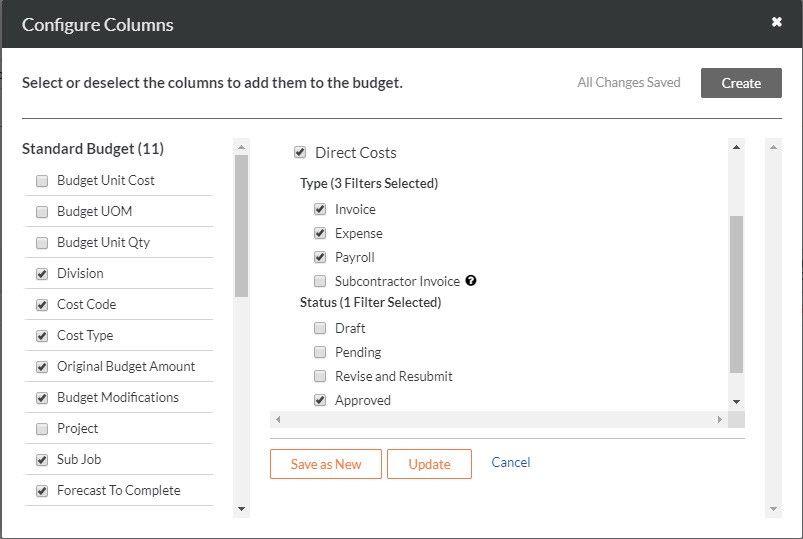
- Type. Place a checkmark in the Progress Claim, Expense, and Payroll boxes.
- Column Name. Enter a name for the new column name.
- Choose from these options:
- If this is a new column, click Create.
- If this is an existing column and you want to save the new settings, click Update.
- If this is an existing column but want to save the new settings to a new column, click Save as New.
Step 3: Add a 'Commitment Progress Claims' Source Column
The final step is to create a 'Commitment Progress Claims' source column.
Notes
- This column does NOT include data from the subcontractor progress claims created in Procore.
- This column syncs subcontractor progress claim data created in Sage 300 CRE® and Xero™ with the project's Direct Costs tool in Procore.
- MRI Platform X® does not sync subcontractor progress claim data with project's Direct Cost tool in Procore.
- In the 'Configure Columns' window, click Create Source Column.
- Under New Source Column, do the following:
- Column Name. Enter a name for the new column name.
For example, type: Sub - Column Source. Select Subcontractor Progress Claims at the source category from the drop-down list.
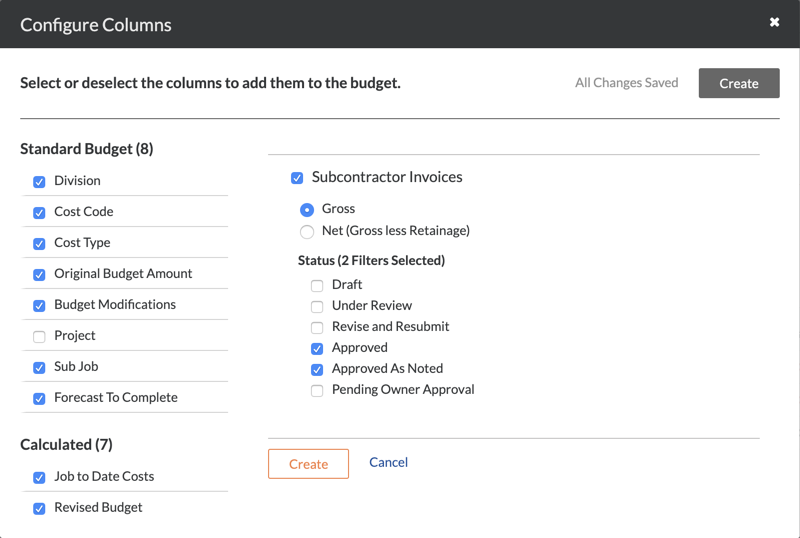
- Direct Costs. Place a checkmark in this box. Then, in the boxes that appear:
- Type. Place a checkmark in the Subcontractor Progress Claims box.
- Income Options. Choose one of the options buttons for Gross or Net (Gross less Retention). In this example, we kept the default setting of Gross. However, you can choose the best option for your project's budget.
- Status. Place a checkmark in one or more boxes to limit the details to items in the selected status. In this example, we have selected Approved. However, your choices include: Draft, Pending, Revise and Resubmit, and/or Approved.
- Column Name. Enter a name for the new column name.
- Choose from these options:
- If this is a new column, click Create.
- If this is an existing column and you want to save the new settings, click Update.
- If this is an existing column but want to save the new settings to a new column, click Save as New.