Import Viewpoints to the Co-Ordination Issues Tool
Objective
To import viewpoints from Navisworks® to the Co-ordination Issues tool using the Procore plugin.
Background
Importing viewpoints from Navisworks® to Procore helps your teams transition from using a viewpoints workflow to using the Procore Co-ordination Issues tool and plugin. Imported viewpoints will be created as issues in the Co-ordination Issues tool so they can be tracked and managed in Procore.
Things to Consider
- Required User Permissions:
- 'Admin' level permissions on the project's Co-ordination Issues tool.
- Additional Information:
- Information from a viewpoint is carried over to the issue created from the import:
- The title of the viewpoint becomes the Title of the coordination issue.
- Any comments on the viewpoint are carried over to the Description field of the issue.
- Any markups on the viewpoint, excluding Cloud markups, are also included on the issue.
- To prevent duplication or redundant issues from being imported, a folder that has already been imported from through the plugin will not be available as an option to select for another import.
- Information from a viewpoint is carried over to the issue created from the import:
Video
Steps
- Open the Navisworks® application on your computer.
- Click the Procore tab to open the Procore plugin.
- Open the model you want to import viewpoints from.
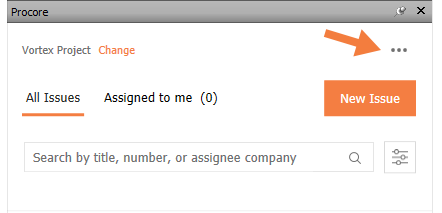
- In the plugin, click the ellipsis icon to open the drop-down menu.

- Click Import from Viewpoints.
Note: All folders and viewpoints will be shown in the 'Convert Viewpoints to Issues' window. - Mark the checkbox next to a viewpoint to select a single viewpoint or the checkbox next to a folder containing multiple viewpoints.
Note: Click Select All to import all viewpoints. - Select the following fields from the drop-down menus:
Note: Fields with an asterisk * are required.- Status*
- Open: Select to create new issues that require action.
- Closed: Select to create historical issues that have already been resolved.
- Assignee
- Location
- Status*
- Click Create.
Note: All viewpoints will be created as issues in the project.

