Equipment User Guide
Table of Contents
- Welcome
- Add, Remove, and Check In Equipment
- Inspect Equipment
- Equipment Incidents
- Add Equipment Site Diary Entries
- Daywork Sheets for Equipment
- Enter Time for Equipment
- View Equipment Hours in your Project's Budget
- Generate and Print QR Codes
- View Project Equipment
Overview
Add (Web)
Remove (Web)
Background
Removing equipment from a project makes it unavailable in the project's drop-down menus.
Things to Consider
Steps
-
Navigate to the project's Equipment tool.
-
Remove equipment.
-
Remove Inline
-
Hover over the equipment record and click the remove
 icon.
icon. -
Click Remove to confirm.
-
-
Bulk Remove
-
Mark the checkboxes for the equipment you want to remove.
-
Click Remove from Project.
-
Click Remove to confirm.
-
-
Create Equipment Records (Web)
Check in Equipment (Web)
Background
You can assign equipment to multiple projects and track which one currently has the equipment 'onsite'.
In Beta
Company Administrators can enable the Equipment - Geofence & Telematics Based Project Tracking beta in Procore Explore. (US 1 | US 2 | UK)
In the Project level Locations tool, you can set up site boundary locations to create geofences.
After you set up geofences, you can configure automated project tracking to automatically update the equipment 'Onsite' field via a telematics connection. When an equipment GPS location is detected inside our outside the geofence, the system updates the equipment's Onsite field accordingly.
Tip
To see all projects equipment is assigned to, see View Equipment Project Assignments.Things to Consider
-
Company Level Required User Permissions
-
Project Level Required User Permissions
-
If equipment is checked in for a project from the field, the current project is automatically updated. See Check In Project Equipment (iOS) or Check in Project Equipment (Android).
-
For accounts without telematics, equipment marked 'On Site' reflects the project's address on the Company Equipment map.
Prerequisites
-
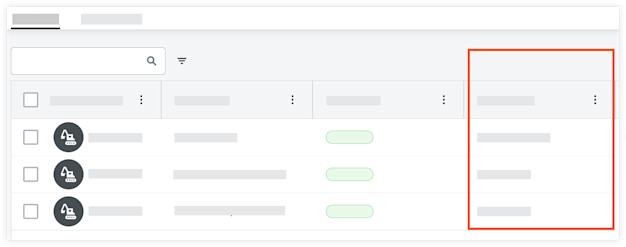
The field must be enabled on the table. See Configure Columns for the Company Equipment Tool.
Steps
-
Set a Single Record
-
Bulk Set Equipment
Set Equipment Onsite
-
Navigate to the Company or Project level Equipment tool.
-
Inline, click the field in 'Onsite' column.
-
Company Level
-
Select the project to mark the equipment onsite, or click the X to remove it from onsite.
-
-
Project Level
-
Select Yes or No to indicate if equipment is onsite.
-
-
Set Equipment Onsite in Bulk
-
Navigate to the Company or Project level Equipment tool.
-
Mark the checkboxes for the equipment you want to assign.
-
Mark equipment onsite accordingly:
-
Company Level
-
Click Add to Projects.
-
Select the projects.
-
Optional: For each project, move the toggle
 ON if the equipment has arrived onsite.
 -
Click Add.
-
-
Project Level
-
Click the Onsite drop-down menu and select Yes or No.
-
-
Check in Equipment (iOS)
Things to Consider
-
After you check in equipment from the project, the following is updated in Procore:
-
The equipment is added to your project's Equipment tool.
-
The project is set as the 'Current Project' to show where equipment is onsite in the company's Equipment tool.
-
When scanning the QR Code, the GPS location of your mobile device is used to update the location of the equipment if Location Services are enabled.
-
Steps
-
Navigate to the Equipment tool using the Procore app on an iOS mobile device.
-
Tap the equipment record to view details.
OR
Tap the QR code icon. Then point your camera toward the QR code to open the equipment details page.
 -
If the equipment has not yet been added to your project, tap Add to Project.
-
Move the 'Onsite' toggle
to the ON position to mark it as 'onsite'.
Remove Equipment (iOS)
Things to Consider
- Required User Permissions
- After you remove equipment from the project, the following is updated in Procore:
- The equipment is removed from your project's Equipment register.
- The project is removed as the 'Current Project' in the company's Equipment tool.
Steps
- Navigate to the Equipment tool using the Procore app on an iOS mobile device.
- Tap the equipment record to view details.
- Tap the equipment record.
OR
Tap the QR code icon and point your camera toward the QR code.
The QR code will be scanned and show the equipment details. - Click the horizontal ellipsis
 and select Remove from Project List.
The equipment is removed from your project's Equipment register.
The project is removed as the 'Current Project' in the company's Equipment tool.
Check in Equipment (Android)
Things to Consider
-
After you check in equipment from the project, the following is updated in Procore:
-
The equipment is added to your project's Equipment tool.
-
The project is set as the 'Current Project' to show where equipment is onsite in the company's Equipment tool.
-
When scanning the QR Code, the GPS location of your mobile device is used to update the location of the equipment if Location Services are enabled.
-
Steps
-
Navigate to the Equipment tool using the Procore app on an Android mobile device.
-
Tap the equipment record to view details.
OR
Tap the QR code icon. Then point your camera toward the QR code to open the equipment details page. -
If the equipment has not yet been added to your project, tap Add to Project.
-
Move the 'Onsite' toggle
to the ON position to mark it as 'onsite'.
Remove Equipment (Android)
Things to Consider
- Required User Permissions
- After you check in equipment from the project, the following is updated in Procore:
- The equipment is removed from your project's Equipment register.
- The project is removed as the 'Current Project' in the company's Equipment tool.
Steps
- Navigate to the Equipment tool using the Procore app on an Android mobile device.
- Tap the equipment record.
OR
Tap the QR code icon and point your camera toward the QR code.
The QR code will be scanned and show the equipment details. - Click the horizontal ellipsis and select Remove from Project List.
The equipment is removed from your project's Equipment register.
The project is removed as the 'Current Project' in the company's Equipment tool.
See Also
Program Equipment Inspections (Web)
Create Inspection (Web)
Things to Consider
-
After a company template is copied to your project, it becomes a project template that can be modified without affecting the company template from which it originated.
-
Project templates may be modified in the Project level Inspections tool throughout the duration of the project, but changes will only be reflected on project checklists that are created from the modified template.
-
You can use a default inspection template more than once.
-
Selecting an asset when creating or editing an Inspection, automatically links the Inspection to the asset as a related item.
-
You can click the asset link in the Inspection to view the asset's details in the Assets tool.
Prerequisites
-
Add Templates
-
To create an inspection for assets, you must first configure the following settings:
-
The Assets tool must be enabled for your project. See Add and Remove Project Tools.
-
Assets records must be added to your project. See Add or Remove Equipment from Projects.
-
Assets must be enabled on your configurable fieldset for inspections. See Edit Configurable Fieldsets.
-
-
To create an inspection for equipment, you must first configure the following settings:
-
The Equipment tool must be enabled for your project. See Add and Remove Project Tools.
-
Equipment records must be added to your project. See Add or Remove Equipment from Projects.
-
Equipment must be enabled on your configurable fieldset for inspections. See Edit Configurable Fieldsets.
-
Create a Single Inspection
-
Navigate to the Project level Inspections tool.
-
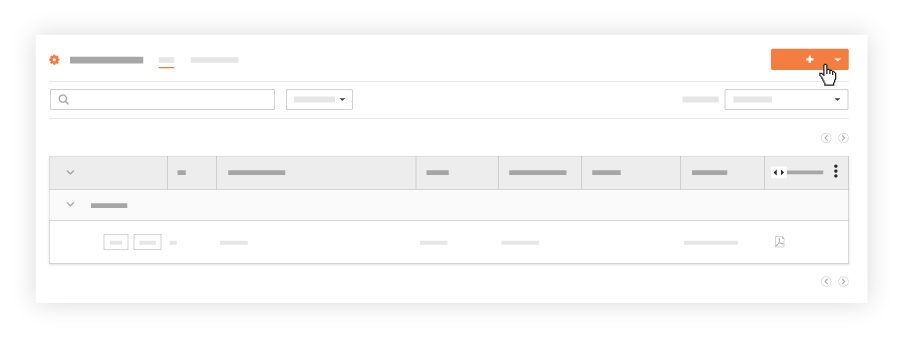
Click Create.
Note: If your company does not yet have Company level inspection templates set up, you first need to create an inspection template.
-
Select Inspection.
-
Select a default inspection template from your list of templates from the drop-down menu. Note: Templates must be added to your project. See Add Company Level Inspection Templates to Your Project.
-
-
-
Optional: Under Inspection Items Preview, review the inspection items and their response options.
-
Click Create.
Bulk Create Inspections
In Beta
The Bulk Create Inspections feature is currently in open beta and can be enabled within Procore Explore.With the bulk create feature, you can quickly create multiple inspections with identical details to save time.
-
In the new field titled Number of Inspections, enter the desired quantity. You can use the up/down arrows or type the number directly.
-
Optionally, you can set the starting number for the inspections in the sequence. For example, if you set the starting number to 64 and the number of inspections to 5, the inspections will be numbered sequentially starting at 64.
-
Fill in all the other inspection details (e.g., location, assignee, due date) as you normally would.
Note: All the inspections created in this bulk action will have the exact same details. This feature does not allow you to assign different locations or assignees for each individual inspection. -
Once you have filled in all the details, click Create.
Next Steps
Perform Inspection (Web)
Create Inspection (iOS)
Things to Consider
- Required User Permissions
-
You can configure what items are created with the quick create
 icon, see Configure Quick Create Settings.
Prerequisites
- To create an inspection for equipment, you must first configure the following settings:
- The Equipment tool must be enabled for your project. See Add and Remove Project Tools.
- Equipment records must be added to your project. See Add or Remove Equipment from Projects.
- Equipment must be enabled on your configurable fieldset for inspections. See Edit Configurable Fieldsets.
Steps
You can create an inspection from the following places:
Create an Inspection from the Equipment Tool
- Navigate to the Equipment tool using the Procore app on an iOS mobile device.
- Tap the equipment record.
OR
Tap the QR code icon. Then point your camera toward the QR code to open the equipment details page. - Click the horizontal ellipsis and select Create Inspection.
- Tap the template you want to use for the inspection.
Note: Inspection templates are created by users with 'Admin' permissions to the Company level Inspections tool. If none appear here, contact an Inspections Admin user to have them Create a Company Level Inspection Template or Add Inspection Templates to Your Project. - Tap into the following fields to add the appropriate information:
- Status: Select the status of the inspection. New inspections are in 'Open' status by default.
Note: An inspection's status should be set to 'open' when someone begins performing the inspection. It should remain open until there are no more deficient items on the inspection. At this point, you should change the status to 'closed' to indicate that no further action is needed. - Add Attachments:
 Camera: Tap to open your device's camera and take a photo to add to the inspection.
  Photos: Tap to select an image from your device's photo library or Procore Photos. After you select the photos, click Add or Done.
 Files: Tap to select a saved file from your device's files.
- Trade: Select a trade related to your inspection.
Note: If you do not have trades added to your company, the 'Trade' field will appear as an empty field. You will need to add these to the Company level Admin tool before you can fill this field out. See Add or Delete Trades. - Inspection Date: Select the date the inspection is taking place.
- Due Date: Select the date the inspection needs to be completed by.
- Assignees: Select one or more assignees that will be responsible for the inspection.
- Location: Select a location associated with the inspection.
Note: You can also scan a location's QR code to enter a location:- Tap the QR code
 icon in the upper right on the Locations menu.
 - Point the camera of your device to the QR code to scan it.
Procore automatically scans your location and adds it to the inspection.
- Tap the QR code
- Responsible Contractor: Select the company that performed the work to be inspected.
Note:- If you selected a point of contact before this, you will only be able to choose from the contractor that point of contact is associated with.
- If no contracting companies exist in the project's Directory, you will not be able to select a 'Point of Contact'.
- Point of Contact: Select a person to be the point of contact for the inspection. If you selected a 'Responsible Contractor' before this, you will only be able to choose a contact who is associated with that company.
Note: Only users with 'Standard' level permissions or above on the Observation tool may be listed as the Inspection's 'Point of Contact'. - Specification Section: Select a specification section to associate with the inspection.
- Private. Move the toggle to the ON
 or OFF
  position. Private inspections are only visible to the 'Point of Contact', 'Assignee(s)', members added to the inspection's distribution list, and 'Admin' level users on the project's Inspections tool.
 - Description: Enter a description of the inspection.
- Status: Select the status of the inspection. New inspections are in 'Open' status by default.
- Tap Create.
Create an Inspection from the Inspections Tool
- Open the Procore app on an iOS mobile device and select a project.
Note: This loads the Tools screen for the project. - Tap the quick create
 icon and select Inspection.
OR
Tap the Inspections tool and tap the create icon. - Tap the template you want to use for the inspection.
Note: Inspection templates are created by users with 'Admin' permissions to the Company level Inspections tool. If none appear here, contact an Inspections Admin user to have them Create a Company Level Inspection Template or Add Inspection Templates to Your Project. - Tap into the relevant fields to add the appropriate information.
- Tap Create.
Next Steps
Perform Inspection (iOS)
Things to Consider
- Required User Permissions
- Additional Information:
- This action can also be performed while an active network connection is not available on your mobile device (offline mode). Tasks performed in offline mode will be synced with Procore after a network connection has been reestablished.
Prerequisites
Steps
- Navigate to the project's Inspections tool using the Procore app on an iOS mobile device.
- Tap the inspection you want to perform.
- Complete the item with the appropriate response.
Note: Based on your response, some inspection items may also require you to add a photo or an observation. - Optional: Tap the info
 icon for an inspection item to perform additional actions.
- Tap Comment to add a comment and then tap Save.
- Tap Photo to either take a new photo or select an existing one from your device to attach to the item.
- Tap Observation if you want to create an observation. See Create an Observation from an Inspection (iOS).
Create Inspection (Android)
Things to Consider
- Required User Permissions
-
Additional Information:
-
This action can also be performed while an active network connection is not available on your mobile device (offline mode). Tasks performed in offline mode will be synced with Procore after a network connection has been reestablished.
-
You can configure what items are created with the quick create
icon, see Configure Quick Create Settings.
-
Prerequisites
- To create an inspection for equipment, you must first configure the following settings:
- The Equipment tool must be enabled for your project. See Add and Remove Project Tools.
- Equipment records must be added to your project. See Add or Remove Equipment from Projects.
- Equipment must be enabled on your configurable fieldset for inspections. See Edit Configurable Fieldsets.
Steps
You can create an inspection from the following places:
Create an Inspection from the Equipment Tool
- Navigate to the Equipment tool using the Procore app on an iOS mobile device.
- Tap the equipment record.
OR
Tap the QR code icon. Then point your camera toward the QR code to open the equipment details page. - Click the horizontal ellipsis and select Create Inspection.
- Tap the template you want to use for the inspection.
Note: Inspection templates are created by users with 'Admin' permissions to the Company level Inspections tool. If none appear here, contact an Inspections Admin user to have them Create a Company Level Inspection Template or Add Inspection Templates to Your Project. - Tap into the following fields to add the appropriate information:
- Status: Select the status of the inspection. New inspections are in 'Open' status by default.
Note: An inspection's status should be set to 'open' when someone begins performing the inspection. It should remain open until there are no more deficient items on the inspection. At this point, you should change the status to 'closed' to indicate that no further action is needed. - Add Attachments:
- Camera: Tap to open your device's camera and take a photo to add to the inspection.
- Photos: Tap to select an image from your device's photo library or Procore Photos. After you select the photos, click Add or Done.
- Files: Tap to select a saved file from your device's files.
- Trade: Select a trade related to your inspection.
Note: If you do not have trades added to your company, the 'Trade' field will appear as an empty field. You will need to add these to the Company level Admin tool before you can fill this field out. See Add or Delete Trades. - Inspection Date: Select the date the inspection is taking place.
- Due Date: Select the date the inspection needs to be completed by.
- Assignees: Select one or more assignees that will be responsible for the inspection.
- Location: Select a location associated with the inspection.
Note: You can also scan a location's QR code to enter a location:- Tap the QR code icon in the upper right on the Locations menu.
- Point the camera of your device to the QR code to scan it.
Procore automatically scans your location and adds it to the inspection.
- Tap the QR code
- Responsible Contractor: Select the company that performed the work to be inspected.
Note:- If you selected a point of contact before this, you will only be able to choose from the contractor that point of contact is associated with.
- If no contracting companies exist in the project's Directory, you will not be able to select a 'Point of Contact'.
- Point of Contact: Select a person to be the point of contact for the inspection. If you selected a 'Responsible Contractor' before this, you will only be able to choose a contact who is associated with that company.
Note: Only users with 'Standard' level permissions or above on the Observation tool may be listed as the Inspection's 'Point of Contact'. - Specification Section: Select a specification section to associate with the inspection.
- Private. Move the toggle to the ON or OFF position. Private inspections are only visible to the 'Point of Contact', 'Assignee(s)', members added to the inspection's distribution list, and 'Admin' level users on the project's Inspections tool.
- Description: Enter a description of the inspection.
- Status: Select the status of the inspection. New inspections are in 'Open' status by default.
- Tap Create.
Create an Inspection from the Inspections Tool
- Open the Procore app on an Android mobile device and select a project.
Note: This loads the Tools screen for the project. - Tap the quick create icon and select Inspection.
OR
Tap the Inspections tool and tap the create icon. - Tap to select a template you want to create an inspection from.
Note: Inspection templates are created by users with 'Admin' permissions to the Company level Inspections tool. If none appear here, contact an Inspections Admin user to have them Create a Company Level Inspection Template or Add Inspection Templates to Your Project. - Tap into the relevant fields to enter information as appropriate.
- Inspection Items: Tap to view inspection items that have been carried over from the inspection template. These items are not editable.
- Tap Create.
Next Steps
Perform Inspection (Android)
Things to Consider
- Required User Permissions
-
This asset or item can be viewed or edited in offline mode if it was previously viewed and cached on your mobile device. Tasks performed in offline mode sync with Procore once a network connection is reestablished.
Prerequisites
Steps
- Navigate to the project's Inspections tool using the Procore app on an Android mobile device.
- Tap the inspection you want to perform.
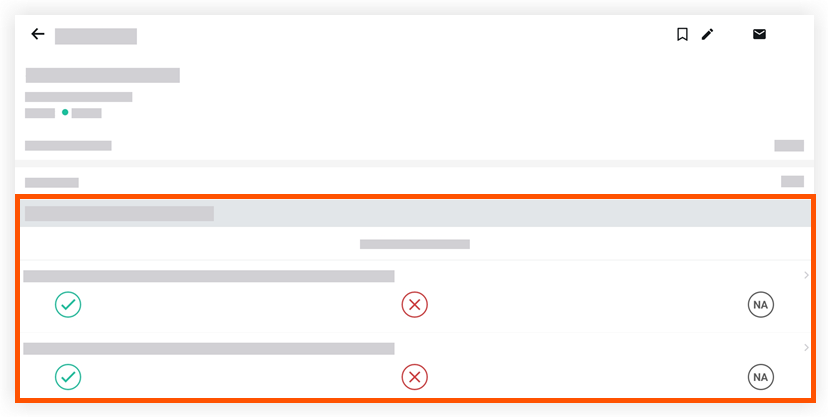
- Complete the status of each item by tapping the appropriate response (e.g. Pass/ Safe
 , Fail/ At Risk
  , or N/A
  ).
).
Note: Some items may require you to select from a custom response set or respond in the form of text, date, or number entry. - Based on your response, some inspection items may also require you to add a photo or an observation.
- Optional: Add comments or attachments to an inspection item.
- Tap the inspection item.
- Tap the Attachment
 icon to add a file or tap into the text box to add a comment.
- Tap Save.
Create an Incident (Web)
Also available on 

Objective
To create an incident in the Incidents tool.
Things to Consider
- Required User Permissions:
- 'Standard' or 'Admin' level permissions on the project's Incidents tool.
Prerequisites
- Add the Incidents Tool to the Project Tools menu. See Add and Remove Project Tools.
- Optional: If your company wants to configure the required fieldsets for data entry, complete the steps in Create New Configurable Fieldsets.
Video
Steps
- Navigate to the project's Incidents tool.
- Click the Incidents tab.
- Click +Create.
- Add the following information, as applicable:
- In the 'Incident Information' section:
- Title. Enter a descriptive name to describe the incident.
- Distribution. Enter the users whom you want to give access to the incident in Procore.
Note: Users added to this list will be sent an email notification when the incident is created. To send the incident to team members later, see Email Incidents. - Location. Select the location where the incident occurred from the list.
- Event Date. Select the date the incident occurred.
- Event Time. Select the time the incident occurred.
OR - Time Unknown. Mark this checkbox if the time the incident occurred is unknown.
- Recordable. Mark this checkbox if this incident is legally classified as a recordable incident by a regulatory agency or governing body.
- Private. Mark this checkbox to designate the incident as 'Private'. Private incidents are only visible to their creators, users added to the Distribution list and users with 'Admin' level permissions on the project's Incidents tool.
- Description. Enter a detailed description of the incident.
- Attachments. Attach any relevant files.
- In the 'Investigation Information' section:
- Hazard. Select the hazard the person affected was involved with (e.g., Caught In).
- Contributing Condition. Select the condition that contributed to the incident (e.g., Defective Equipment).
- Contributing Behaviour. Select the behaviour that contributed to the incident (e.g., Distraction).
- In the 'Incident Information' section:
- Click Create.
- Optional: Add a record, witness statement or action to the incident after it has been created.
See Also
Create an Incident (iOS)
Things to Consider
- Required User Permissions:
- 'Standard' or 'Admin' level permissions on the project's Incidents tool.
- Additional Information:
- You can configure what items are created with the quick create icon, see Configure Quick Create Settings.
- You can configure what items are created with the quick create
Steps
- Open the Procore app on an iOS mobile device and select a project.
Note: This loads the Tools screen for the project. - Tap the quick create icon and select Incident.
OR
Tap the Incidents tool and tap the create icon. - Enter the following information, as appropriate:
- Title: Enter a descriptive title that accurately describes the incident.
- Attachments:
- Camera: Tap to open your device's camera and take a photo to add to the incident.
- Photos: Tap to select an image from your device's photo library or Procore Photos. After you select the photos, click Add or Done.
- Files: Tap to select a saved file from your device's files.
- Location: Select a location from the drop-down menu. See How do I add a multi-tiered location to an item?
- Event Date: Select the date associated with the incident.
- Time Unknown: If the time of the incident is unknown, tap the toggle to indicate that the time of the incident is unknown.
- Event Time: If the time is known, enter a time associated with the incident.
- Distribution: Enter the users to whom you want to give access to the incident in Procore.
Note: Users added to this list will be sent an email notification when the incident is created. - Private: Tap the toggle to mark the incident as 'Private' to hide it from everyone except Incident tool 'Admin' users and the creator of the incident.
- Hazard: Select a hazard associated with the incident.
- Contributing Behaviour: Select a contribution behaviour associated with the incident.
- Contributing Condition: Select a contributing condition associated with the incident.
- Description: Enter a description of the incident.
- Tap Create.
Create an Incident (Android)
Things to Consider
- Required User Permissions:
- 'Standard' or 'Admin' level permissions on the project's Incidents tool.
- Additional Information:
- You can configure what items are created with the quick create icon, see Configure Quick Create Settings.
- You can configure what items are created with the quick create
Prerequisites
- Add the Incidents Tool to the Project Tools menu in the Procore web app. See Add and Remove Project Tools.
- Optional: If your company wants to configure the required fieldsets for data entry, complete the steps in Create New Configurable Fieldsets.
Steps
- Open the Procore app on an Android mobile device and select a project.
Note: This loads the Tools screen for the project. - Tap the quick create icon and select Incident.
OR
Tap the Incidents tool and tap the create icon. - Enter the following information:
- Title: Enter a descriptive title that accurately describes the incident.
- Location: Select a location from the drop-down menu. See How do I add a multi-tiered location to an item?
- Event Date: Select the date associated with the incident.
- Time Unknown: If the time of the incident is unknown, tap the toggle to indicate that the time of the incident is unknown.
- Event Time: If the time is known, enter a time associated with the incident.
- Distribution: Enter the users to whom you want to give access to the incident in Procore.
Note: Users added to this list will be sent an email notification when the incident is created. - Private: Tap the toggle to mark the incident as 'Private' to hide it from everyone except Incident tool 'Admin' users and the creator of the incident.
- Hazard: Select a hazard associated with the incident.
- Contributing Behaviour: Select a contribution behaviour associated with the incident.
- Contributing Condition: Select a contributing condition associated with the incident.
- Description: Enter a description of the incident.
- Optional: To add relevant files or photos, tap one of the following options:
- Take Photos: Take a photo with your mobile device's camera and add it to the incident.
- Attachments: Choose a photo or file from your mobile device and add it to the incident.
- Tap Create.
-
Add additional information.
See Also
Create Equipment Entry (Web)
Create Equipment Entry (iOS)
Things to Consider
- Required User Permissions
- To configure what items are created with the quick create icon, see Configure Quick Create Settings.
Steps
Create Equipment Entries
Note
Add or create equipment records in the Project's Equipment tool. See Add or Remove Equipment from Projects in the Project level Equipment Tool.Note: Previously equipment was added and managed added in the Equipment page of the Admin tool.
- Open the Procore app on an iOS mobile device and select a project.
Note: This loads the Tools screen for the project. - Tap the quick create icon and select Equipment Entry.
OR
Tap the Site Diary tool and tap Equipment. Then tap the create icon. - Tap into the following fields to enter information.
- Equipment Name. Tap and select the equipment from the drop-down list.
- Hours Operating. Tap and enter the number of hours the equipment was active.
- Hours Idle. Tap and enter the number of hours the equipment was idle.
- Cost Code. Tap and select the cost code associated with the entry.
- Location. Tap and select the location from the drop-down list.
- Inspected. Tap to mark the checkbox if the equipment was inspected.
- Inspection Time. Tap and enter what time the equipment was inspected.
- Comments. Tap and add any comments.
- Tap Create.
Legacy Content
Create Equipment Entries (Legacy)
Note
Manage any equipment added to this section by viewing the Equipment list on the Equipment page of the Admin tool.
Note: Requires 'Admin' permissions on the Admin tool.
- Open the Procore app on an iOS mobile device and select a project.
- Note: This loads the Tools screen for the project.
- Tap the quick create icon and select Equipment Entry.
OR
Tap the Site Diary tool and tap Equipment. Then tap the create icon. - Tap into the following fields to enter information.
- Tap Create.
See Also
Create Equipment Entry (Android)
Things to Consider
-
To configure what items are created with the quick create
icon, see Configure Quick Create Settings.
Steps
Create Equipment Entries
Note
Add or create equipment records in the Project's Equipment tool. See Add or Remove Equipment from Projects in the Project level Equipment Tool.Note: Previously equipment was added and managed added in the Equipment page of the Admin tool.
-
Open the Procore app on an iOS mobile device and select a project.
Note: This loads the Tools screen for the project. -
Tap the quick create
icon and select Equipment Entry.
OR
Tap the Site Diary tool and tap Equipment. Then tap the create icon. -
Tap into the following fields to enter information.
-
Equipment Name: Tap and select the equipment from the drop-down list.
-
Hours Operating: Tap and enter the number of hours the equipment was active.
-
Hours Idle: Tap and enter the number of hours the equipment was idle.
-
Cost Code: Tap and select the cost code associated with the entry.
-
Location: Tap and select the location from the drop-down list.
-
Inspected: Tap to mark the checkbox if the equipment was inspected.
-
Inspection Time: Tap and enter what time the equipment was inspected.
-
Comments: Tap and add any comments.
-
-
Tap Create.
Tip
-
Click Fix Errors to go to the first empty field, if the required fields are empty.
-
Click Next Field or Previous Field to view other empty required fields.
After the required fields have been entered, you will be able to create or save the form.
Create a Daywork Sheet (Web)
Create a Daywork Sheet (iOS)
Objective
To create a Time and Materials sheet in the Daywork Sheets tool using the Procore app on an iOS mobile device.
Things to Consider
-
You can configure what items are created with the quick create
icon, see Configure Quick Create Settings.
Prerequisites
Steps
- Open the Procore app on an iOS mobile device and select a project.
Note: This loads the Tools screen for the project. - Tap the quick create icon and select Daywork Sheet.
OR
Tap the Daywork Sheets tool and tap the create icon. - Tap to enter information into the following fields as appropriate:
Note: An asterisk (*) indicates that the field is required.- Description*: Enter a short description of the work for the Daywork Sheet.
- Status: The status of your sheet will update automatically when certain conditions have occurred.
- In Progress: This is the default status when a sheet is created and has not been signed by the Company or Customer Signee.
- Ready for Review: The sheet will update to this status when the assigned Company Signee has verified the sheet's labour, equipment and material to indicate that it is ready for customer review.
- Field Verified: The sheet will update to this status when the Customer Signee has verified and signed it.
- Closed: Sheets can be set to 'Closed' status on the desktop app to indicate that the sheet is closed or has been sent to the client and should not be edited.
Note: Sheets can only be moved to the 'Closed' status on the desktop app and cannot be edited on the mobile app. To edit a closed sheet, you will need to reopen it from the desktop app. For instructions on how to close or reopen a sheet, see Close or Reopen a Daywork Sheet.
- Performed On*: This field defaults to the current day.
- Locations: Tap to select the location where the work is being performed.
Note: Users with 'Admin' permissions or users who have the "Manage Locations" granular permission enabled on the Admin tool can add a location. See Add Tiered Locations to a Project. - Ordered by: Select the users who ordered the sheet.
Note: A user must be recorded in the Project level Directory tool to be selected from this list. To add someone to the project directory, see Add a Person to the Project Level Directory (iOS). - Reference #: Enter the Variation number that will be associated with the Daywork sheet.
- Attachments:
- Camera: Tap to open your device's camera and take a photo to add to your Daywork sheet.
- Photos: Tap to select an image from your device's photo library or Procore Photos. After you select the photos, click Add or Done.
- Files: Tap to select a saved file from your device's files
- In the 'Labor' section, under 'Employees', tap on the following fields to enter information as needed:
- Employee*: Select the employee from the Workers list.
Note: To add a worker to the list, see Add a Worker (iOS). - Classification: Select the employee’s classification from the list.
- Hours*: Enter the number of working hours the employee performed.
- Time Type: Select the time type for the work.
- Employee*: Select the employee from the Workers list.
- Tap Apply.
- In the 'Materials' section, under 'Quantities', tap on the following fields to enter information as needed:
- Material*: Enter the type of material used.
- Material Description: Enter a description of the material or the progress claim number for the material delivery.
- Unit*: Select a unit of measurement from the list.
- Quantity*: Enter the quantity of materials needed.
- Tap Apply.
- In the 'Equipment' section, under 'Quantities', tap on the following fields to enter information as needed:
- Equipment Name*: Select the equipment used from the list.
- Equipment Description: Type any relevant information about the equipment item such as the type, equipment ID number or delivery ID number.
- Hours*: Type in the number of hours the equipment was used.
- Tap Apply.
- In the 'Approvals' section, under 'Company Signee', select the user from the list.
- Under 'Customer Signee', select the customer name from the list.
- Optional: In the 'Notes' section, under 'More Information', type in any additional information as needed.
- Tap Save.
Create a Daywork Sheet (Android)
Objective
To create a Daywork Sheet using the Procore app on an Android mobile device.
Things to Consider
-
You can configure what items are created with the quick create
icon, see Configure Quick Create Settings.
Prerequisites
Steps
- Open the Procore app on an Android mobile device and select a project.
Note: This loads the Tools screen for the project. - Tap the quick create icon and select Daywork Sheet.
OR
Tap the Daywork Sheets tool and tap the create icon. - Tap into the following fields to enter the appropriate information:
Note: An asterisk (*) indicates that the field is required.- Description*: Enter a short description of the work for the Daywork Sheet.
- Status: The status of your sheet will update automatically when certain conditions have occurred.
- In Progress: This is the default status when a sheet is created and has not been signed by the Company or Customer Signee.
- Ready for Review: The sheet will update to this status when the assigned Company Signee has verified the sheet's labour, equipment and material to indicate that it is ready for customer review.
- Field Verified: The sheet will update to this status when the Customer Signee has verified and signed it.
- Closed: Sheets can be set to 'Closed' status on the desktop app to indicate that the sheet is closed or has been sent to the client and should not be edited.
Note: Sheets can only be moved to the 'Closed' status on the desktop app and cannot be edited on the mobile app. To edit a closed sheet, you will need to reopen it from the desktop app. For instructions on how to close or reopen a sheet, see Close or Reopen a Daywork Sheet.
- Performed On*: This field defaults to the current day.
- Location: Tap to select the location where the work is being performed.
- Ordered by: Select the users who ordered the sheet.
Note: A user must be recorded in the Project level Directory tool to be selected from this list. To add someone to the project directory, see Add a Person to the Project Level Directory (Android). - Reference #: Enter the Variation number that will be associated with the Daywork sheet.
- Tap the Camera
 icon to take a picture.
OR
Tap the Photos icon to upload a photo from Procore or your device.
OR
Tap the Files icon to upload a photo or video.
 - In the 'Labor' section, under 'Employees', tap on the following fields to enter information as needed:
- Employee*: Select the employee from the Workers list.
Note: To add a worker to the list, see Add a Worker (Android). - Classification: Select the employee’s classification
Link to existing classification article - Hours*: Enter the number of working hours the employee performed.
- Time Type: Select the time type for the work.
- Employee*: Select the employee from the Workers list.
- Tap Apply.
- In the 'Materials' section, under 'Quantities', tap on the following fields to enter information as needed:
- Material*: Enter the type of material used.
- Material Description: Enter a description of the material.
- Unit*: Select a unit of measurement from the list.
- Quantity*: Enter the quantity of materials needed.
- Tap Apply.
- In the 'Equipment' section, under 'Quantities', tap on the following fields to enter information as needed:
- Equipment Name*: Select the equipment used from the list.
- Equipment Description: Type any relevant information about the equipment item.
- Hours*
- Tap Apply.
- In the 'Approvals' section, under 'Company Signee', select the user from the list.
- Under 'Customer Signee', select the customer name from the list.
- Optional: In the 'Notes' section, under 'More Information', type in any additional information as needed.
- Tap Save.
Create a Timesheet (Web)
Create a Timesheet (iOS)
Background
Procore's timecards and timesheets track the hours employees and equipment spend on a construction project.
When timecards are created, they are added to a daily timesheet. Within a timesheet, individual timecard entries track the employee and equipment hours. For employees, information tracked includes cost code, work location, hours worked, time type (like regular or overtime), and whether the hours are billable. For equipment, the task code and the operating hours are tracked.
An administrator can also configure timesheets to record employee data such as classifications and sub jobs.
Tip
You can also Bulk Enter Timecard Entries.Things to Consider
-
You can only bulk enter labour.
-
Employees and workers can have multiple timecard entries on a daily timesheet.
-
Zero hour timecard entries are supported to provide flexibility to enter time off and per diem.
-
'Approved' timecard entries cannot be deleted.
-
Additional edits cannot be made after a timecard entry has been marked as 'Completed.'
-
Company Timesheets Administrators can limit the cost codes and types that appear the selectors when creating timecard entries. See Configure Advanced Settings: Company Level Timesheets.
-
Project Timesheets Administrators configure how time is collected for each project. Additionally, each some fields can be configured as required, optional, or hidden.
-
You can configure what items are created with the quick create
icon. See Configure Quick Create Settings. -
Grid-Based Entry is available on iPads, when task codes are enabled.
-
You can only have one draft per person. Drafts do not appear on web or on another user's device.
Prerequisites
-
To create a timesheet for equipment you must configure the following settings:
-
Enable Task Codes
-
Set the default cost type for Equipment in the Company Timesheets tool.
-
-
To select a site team, first create a site team in the Site teams tool.
-
To add quantities, you must Import a Unit Quantity Based Budget, and optionally, Enable Sub Jobs.
-
To use Grid Entry on a tablet, you must enable Task Codes
Steps
Tip
Tablet users: Tap Change View to toggle between the Grid  and Line
  views.
Line View
-
Open the Procore app on an iOS mobile device and select a project.
-
Tap the quick create
icon and select Timesheet.
OR
Tap the Timesheets tool and tap the create icon. -
If prompted, tap Create New Timesheet.
-
Tap Site teams, Employees, or Equipment.
-
Tap the site teams, employees, or equipment that you want to create a timecard for.
-
Tap Done.
-
Tap the Date field and choose the date that you want to create a timecard for.
-
Tap Done.
-
Enter time for Labour.
-
Tap Add Line next to the site team member or employee name to enter information into the timecard.
-
Tap Add Line to add a new line for the timecard.
-
Tap Apply.
-
-
Enter time for Equipment.
-
Tap Add Line next to the equipment to enter information into the timecard.
-
Tap Add Line to add a new line for the timecard.
-
Tap Apply.
-
-
Review the summary for the timecard's hours, and the daily and weekly hours across all projects.
-
Submit the timesheet.
-
Tap Submit to submit.
-
Tap Submit and Add Quantities to add quantities to a timesheet.
-
Grid View (Tablet Only)
-
Open the Procore app on an iOS tablet and select a project.
-
Initiate a Timesheet
-
New Timesheet
-
Tap the quick create
icon and select Timesheet. -
Tap the Timesheets tool and tap the create
icon and select Create New Timesheet.
-
-
Copy a Timesheet
-
Tap Copy From Previous to copy the previous timesheet that you created.
-
Tap Copy From Any Date to copy any previous timesheet that you have access to. Then tap the timesheet to copy.
-
-
-
Tap Site teams, Employees, or Equipment.
-
Tap the site teams, employees, or equipment that you want to create a timecard for. Then tap Done.
-
Tap the task codes to apply to the timecards. Then tap Done.
Note: Later in the workflow, you will allocate time for the relevant task codes for each person. -
Optional: Tap the date field and select the date that you want to create timecards for.
-
Follow steps to enter or update timecard information:
-
Enter Time by Tapping Cells
-
Tap any task code field for a user or equipment and enter the timecard information.
Note: You can tap multiple cells to bulk enter time.Show/Hide Fields for Labour
Note
Project Timesheets Administrators configure how each project collects time.-
Task Code: A combination of Cost Codes and Sub Jobs.
-
Location: The location where the work was performed.
-
Time
-
Total Time: The total time worked for the day.
-
Start Time: The time the resource started working.
-
Stop Time: The time the resource stopped working.
Note: You will only see the Start and Stop fields if you have configured your settings to show these fields. See Configure Advanced Settings: Project Level Timesheets. -
Lunch Time: The amount of time taken for a lunch break.
Notes:-
The amount of time selected will be subtracted from the Total Time.
-
This field will only be available if Start Time and Stop Time is enabled.
-
-
Time Type: The type of pay being entered.
-
Regular Time
-
Double Time
-
Exempt
-
Holiday
-
Overtime
-
PTO
-
Salary
-
Holiday
-
-
-
Billable: The ON toggle
indicates that entry is billable. -
Auto-Apply Overtime Rules (Beta). The ON toggle
automatically enforces overtime rules. -
Description: Additional comments that will show in the timecard entry.
-
-
Tap Apply.
-
-
Bulk Enter Time Using Checkboxes
-
Tap the checkboxes for the resources you want to enter time for.
-
Enter the information to be applied to all selected timecards.
Note: If you wish not to apply the information to one of the selected cells, tap the highlighted cell to deselect.Show/Hide Fields for Labour
Note
Project Timesheets Administrators configure how each project collects time.-
Task Code: A combination of Cost Codes and Sub Jobs.
-
Location: The location where the work was performed.
-
Time
-
Total Time: The total time worked for the day.
-
Start Time: The time the resource started working.
-
Stop Time: The time the resource stopped working.
Note: You will only see the Start and Stop fields if you have configured your settings to show these fields. See Configure Advanced Settings: Project Level Timesheets. -
Lunch Time: The amount of time taken for a lunch break.
Notes:-
The amount of time selected will be subtracted from the Total Time.
-
This field will only be available if Start Time and Stop Time is enabled.
-
-
Time Type: The type of pay being entered.
-
Regular Time
-
Double Time
-
Exempt
-
Holiday
-
Overtime
-
PTO
-
Salary
-
Holiday
-
-
-
Billable: The ON toggle
indicates that entry is billable. -
Auto-Apply Overtime Rules (Beta). The ON toggle
automatically enforces overtime rules. -
Description: Additional comments that will show in the timecard entry.
-
-
Tap Apply.
-
-
Bulk Enter Time for a Single Task Code
-
Tap the horizontal ellipsis
 for the task code.
 -
Tap Labour Time Entry or Equipment Time Entry.
-
Enter the information to be applied to all selected timecards.
Note: If you wish not to apply the information to one of the selected cells, tap the highlighted cell to deselect.Show/Hide Fields for Labour
Note
Project Timesheets Administrators configure how each project collects time.
-
Task Code: A combination of Cost Codes and Sub Jobs.
-
Location: The location where the work was performed.
-
Time
-
Total Time: The total time worked for the day.
-
Start Time: The time the resource started working.
-
Stop Time: The time the resource stopped working.
Note: You will only see the Start and Stop fields if you have configured your settings to show these fields. See Configure Advanced Settings: Project Level Timesheets. -
Lunch Time: The amount of time taken for a lunch break.
Notes:-
The amount of time selected will be subtracted from the Total Time.
-
This field will only be available if Start Time and Stop Time is enabled.
-
-
Time Type: The type of pay being entered.
-
Regular Time
-
Double Time
-
Exempt
-
Holiday
-
Overtime
-
PTO
-
Salary
-
Holiday
-
-
-
Billable: The ON toggle
indicates that entry is billable. -
Auto-Apply Overtime Rules (Beta). The ON toggle
automatically enforces overtime rules. -
Description: Additional comments that will show in the timecard entry.
-
-
Tap Apply.
-
-
-
Optional: To add another task code, tap Add Code. Select the task code, then tap Done.
-
Optional: To remove a resource, tap the horizontal ellipsis
next to the resource, then tap Delete Resource. -
Review the summary for the timecards' hours, and the daily and weekly hours across all projects.
-
Save or submit timesheet.
-
Tap Save Draft to save the timesheet as a draft and finalise later.
-
Tap Submit to submit.
-
Tap Submit and Add Quantities to add quantities to a timesheet.
-
Next Step
Create a Timesheet (Android)
Background
Procore's timecards and timesheets track the hours employees and workers spend on a construction project.
When timecards are created, they are added to a daily timesheet. Within a timesheet, individual timecard entries track the employee's hours, cost code, work location, hours worked, time type (like regular or overtime), and whether the hours are billable.
An administrator can also configure timesheets to record data such as classifications and sub jobs.
Tip
You can also Bulk Enter Timecard Entries.Things to Consider
-
You can only bulk enter labour.
-
Employees and workers can have multiple timecard entries on a daily timesheet.
-
Zero hour timecard entries are supported to provide flexibility to enter time off and per diem.
-
'Approved' timecard entries cannot be deleted.
-
Additional edits cannot be made after a timecard entry has been marked as 'Completed.'
-
Company Timesheets Administrators can limit the cost codes and types that appear the selectors when creating timecard entries. See Configure Advanced Settings: Company Level Timesheets.
-
Project Timesheets Administrators configure how time is collected for each project. Additionally, each some fields can be configured as required, optional, or hidden.
-
-
-
-
Grid-based entry is available on tablets, when task codes are enabled.
-
When selecting a Site team, the 'Assigned Employees' have corresponding assignments in the Resource Planning tool. Their start and stop times are automatically filled in based on their assignment in Resource Planning.
-
-
You can configure what items are created with the quick create
icon, see Configure Quick Create Settings.
Prerequisites
-
To create a timesheet for equipment you must configure the following settings:
-
Enable Task Codes
-
Set the default cost type for Equipment in the Company Timesheets tool.
-
-
To select a site team, first create a site team in the Site teams tool.
-
To add quantities, you must Import a Unit Quantity Based Budget, and optionally, Enable Sub Jobs.
-
To use Grid Entry on a tablet, you must enable Task Codes.
Steps
Tip
Tablet users: Tap Change View to toggle between the Grid and Line views.Line View
-
Open the Procore app on an Android mobile device and select a project.
-
Tap the quick create
icon and select Timesheet.
OR
Tap the Timesheets tool and tap the create icon. -
Tap New Daily Timesheet.
-
Tap Site teams, Employees, or Equipment.
-
Tap the site teams, employees, or equipment that you want to create a timesheet for.
-
Tap Done.
-
Tap the Date field and choose the date that you want to create a timesheet for.
-
Tap Done.
-
Enter time for Labour.
-
Tap Add Line next to the site team member or employee name to enter information into the timecard.
-
-
Tap Add Line to add a new line for the timecard.
-
Tap Save.
-
-
Enter time for Equipment.
-
Tap Add Line next to the equipment to enter information into the timecard.
-
-
Tap Add Line to add a new line for the timecard.
-
Tap Save.
-
-
Review the summary for the timecard's hours, and the daily and weekly hours across all projects.
-
Submit the timesheet.
-
Tap Submit.
-
Tap Submit and Add Quantities. See Add Quantities to a Timesheet (Android).
-
Grid View (Tablet Only)
-
Open the Procore app on an Android mobile device and select a project.
-
Tap the quick create
icon and select Timesheet.
OR
Tap the Timesheets tool and tap the create icon. -
Tap New Daily Timesheet.
-
Tap Site teams, Employees, or Equipment.
-
Tap the site teams, employees, or equipment that you want to create timecards for.
-
Tap Next.
-
Tap the task codes to apply to the timecards. Then tap Done.
Note: Later in the workflow, you will allocate time for the relevant task codes for each person. -
Tip
Tap Change View and select Grid View or Line View . -
Optional: Tap the date field and select the date that you want to create timecards for.
-
Follow steps to enter or update timecard information:
-
Enter Time by Tapping Cells
-
Tap any task code field for a user or equipment and enter the timecard information.
Note: You can tap multiple cells to bulk enter time.Show/Hide Fields for Labour
Note
Project Timesheets Administrators configure how time is collected for each project. Additionally, each some fields can be configured as required, optional, or hidden.-
Task Code: A combination of Cost Codes and Sub Jobs.
-
Location: The location where the work was performed.
-
Time
-
Total Time: The total time worked for the day.
-
Start Time: The time the resource started working.
-
Stop Time: The time the resource stopped working.
Note: You will only see the Start and Stop fields if you have configured your settings to show these fields. See Configure Advanced Settings: Project Level Timesheets. -
Lunch Time: The amount of time taken for a lunch break.
Notes:-
The amount of time selected will be subtracted from the Total Time.
-
This field will only be available if Start Time and Stop Time is enabled.
-
-
Time Type: The type of pay being entered.
-
Regular Time
-
Double Time
-
Exempt
-
Holiday
-
Overtime
-
PTO
-
Salary
-
Holiday
-
-
-
Billable: The ON toggle
indicates that entry is billable. -
Auto-Apply Overtime Rules (Beta). The ON toggle
automatically enforces overtime rules. -
Description: Additional comments that will show in the timecard entry.
-
-
Tap Apply.
-
-
Bulk Enter Time Using Checkboxes
-
Tap the checkboxes for the resources you want to enter time for.
-
Enter the information to be applied to all selected timecards.
Note: If you wish not to apply the information to one of the selected cells, tap the highlighted cell to deselect.Show/Hide Fields for Labour
Note
Project Timesheets Administrators configure how time is collected for each project. Additionally, each some fields can be configured as required, optional, or hidden.-
Task Code: A combination of Cost Codes and Sub Jobs.
-
Location: The location where the work was performed.
-
Time
-
Total Time: The total time worked for the day.
-
Start Time: The time the resource started working.
-
Stop Time: The time the resource stopped working.
Note: You will only see the Start and Stop fields if you have configured your settings to show these fields. See Configure Advanced Settings: Project Level Timesheets. -
Lunch Time: The amount of time taken for a lunch break.
Notes:-
The amount of time selected will be subtracted from the Total Time.
-
This field will only be available if Start Time and Stop Time is enabled.
-
-
Time Type: The type of pay being entered.
-
Regular Time
-
Double Time
-
Exempt
-
Holiday
-
Overtime
-
PTO
-
Salary
-
Holiday
-
-
-
Billable: The ON toggle
indicates that entry is billable. -
Auto-Apply Overtime Rules (Beta). The ON toggle
automatically enforces overtime rules. -
Description: Additional comments that will show in the timecard entry.
-
-
Tap Apply.
-
-
Bulk Enter Time for a Single Task Code
-
Tap the horizontal ellipsis
for the task code. -
Tap Bulk Time Entry (Labor) or Bulk Time Entry (Equipment).
-
Enter the information to be applied to all selected timecards.
Note: If you wish not to apply the information to one of the selected cells, tap the highlighted cell to deselect.Show/Hide Fields for Labour
Note
Project Timesheets Administrators configure how time is collected for each project. Additionally, each some fields can be configured as required, optional, or hidden.-
Task Code: A combination of Cost Codes and Sub Jobs.
-
Location: The location where the work was performed.
-
Time
-
Total Time: The total time worked for the day.
-
Start Time: The time the resource started working.
-
Stop Time: The time the resource stopped working.
Note: You will only see the Start and Stop fields if you have configured your settings to show these fields. See Configure Advanced Settings: Project Level Timesheets. -
Lunch Time: The amount of time taken for a lunch break.
Notes:-
The amount of time selected will be subtracted from the Total Time.
-
This field will only be available if Start Time and Stop Time is enabled.
-
-
Time Type: The type of pay being entered.
-
Regular Time
-
Double Time
-
Exempt
-
Holiday
-
Overtime
-
PTO
-
Salary
-
Holiday
-
-
-
Billable: The ON toggle
indicates that entry is billable. -
Auto-Apply Overtime Rules (Beta). The ON toggle
automatically enforces overtime rules. -
Description: Additional comments that will show in the timecard entry.
-
-
Tap Apply.
-
-
-
Optional: To add another task code, tap Add Code. Select the task code and tap Done.
-
Optional: To remove a resource, tap the horizontal ellipsis
next to the resource and tap Delete Resource. -
Review the summary for the timecards' hours, and the daily and weekly hours across all projects.
-
Submit
-
Tap Submit.
-
Tap Submit and Add Quantities. See Add Quantities to a Timesheet (Android).
-
Next Steps
Overview
Things to Consider
-
Required User Permissions:
-
'Admin' on the Company Admin tool.
-
-
Additional Information:
-
To set up a budget view for real-time labour productivity, see Resource Tracking and Project Financials: Setup Guide.
-
To set up a labour productivity cost budget view, see Set Up the Procore Labour Productivity Cost Budget View.
-
Any user with 'Read Only' permission or higher on the Budget tool has access permission to apply the view to a project's budget. See Apply the View, Snapshot, Group, and Filter Options on a Budget or Forecasting View.
-
- For companies using the
 ERP Integrations tool:
- If your company account is using the ERP Integrations tool, Procore automatically provides you with a budget view for your Integrated ERP System. See Which ERP integrations are supported by Procore? for details about your specific ERP connector.
- Any custom budget views that you create for an ERP Integration must contain all of the required ERP data columns. This ensures that Procore can send the required budget data to the company's ERP Integrations tool for acceptance for export to the integrated ERP system by an Accounting Approver. See Send a Budget to ERP Integrations for Accounting Acceptance.
To see equipment hours in your budget, you must create a budget view with the 'Equipment Timecard Hours' column. We recommend using the Labour Productivity Cost view as it contains the most relevant columns, and adding Equipment Timecard Hours to that view.
About the Labour Productivity Cost View
The 'Procore Labour Productivity Cost' budget view provides project teams with the ability to include production quantities on the project's budget. See What are 'production quantities'? Building off the Real-Time Labour Costing feature, the 'Procore Labour Productivity Cost' budget view is designed to provide self-performing and specialty contractors with the ability to gain greater insight into your project's production rates to make better decisions that maximise profit margins. With this release, you can:
- Add and import production units to a project's budget in Procore's Financial Management tools: Budget, Change Events and Variations.
- Collect production units from site personnel with Timecard Entries in the Site Diary and both the Timecards and Timesheets tools.
- Track and compare budgeted production units to installed production units using Procore's Budget and Reports tools.
By default, Procore provides its users with a standard 'Procore Labour Productivity Cost' budget view, which is available to your company's Procore Administrator in the Company level Admin tool.
Example
Procore Labour Productivity Cost Budget View in the Budget Tool
The illustration below shows you the recommended layout for the 'Procore Labour Productivity Cost' budget view, as it will look when applied to your project's Budget tool.
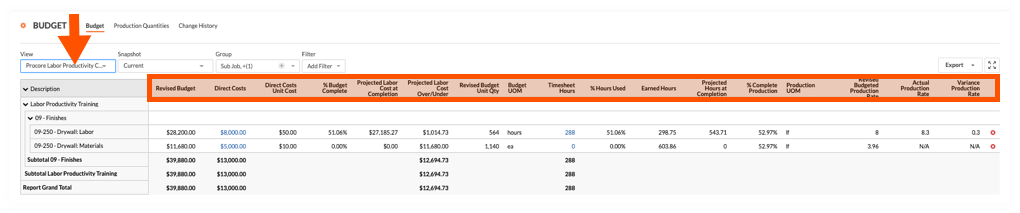
Default Columns
The following table details the default columns provided with the 'Procore Labour Productivity Cost' budget view. In the Description column, the following symbols represent the operator for a calculation:
- add (+)
- subtract (-)
- multiply (*)
- divide (/)
| Column Name | Column Type | Column Format | Column Description | Column Configuration |
|---|---|---|---|---|
| Revised Budget | Calculated | Currency | Shows the Original Budget amount, plus the Budget Change amount, plus the Approved VARs amount. | Original Budget Add (+) Budget Changes Add (+) Approved VARs |
| Direct Costs | Source | Currency | Shows the Direct Costs amount. | Source Category: Direct Costs Source: Direct Costs Source Filtering: Status = Pending, Revise and Resubmit, Approved |
| Direct Costs Unit Cost | Source | Number | Shows the actual cost per unit for direct costs. | Direct Costs Divide (/) Direct Costs Unit Qty |
| % Budget Complete | Calculated | Percent | Shows how much of the current budget amount for the budget line item is estimated to be used based on the real-time labour hours and actual labour cost. | Estimated Cost w/ Timesheet Hours Divide (/) Revised Budget |
| Projected Labour Cost at Completion | Calculated | Currency | Shows the projected labour cost at completion for the budget line item. | Projected Hours at Completion Multiply (*) Direct Costs Unit Cost |
| Projected Labour Cost Over/Under | Calculated | Current | Shows the Revised Budget minus the Projected Labour Cost at Completion. | Revised Budget Subtract (-) Project Labour Cost at Completion |
| Revised Budgeted Unit Qty | Calculated | Number | Shows the Budget Production Qty plus the Approved COs Production Qty. | Budget Unit Qty Add (+) Approved VAR Units |
| Budget UOM | Standard | n/a | Shows the Unit of Measure (UOM) for the budget line item. | n/a |
| Timesheet Hours 1 | Source | Number | Shows all Timecard Entry Hours. You can optionally apply Status filters to narrow the data in the view. | Source Category: Timecard Entry Hours Source: Timecard Entry Hours Filtering: None |
| % Hours Used | Calculated | Percent | Shows how much of the current budget unit qty (labour hours) have been used based on time submitted in Procore. | Timesheet Hours Divide (/) Revised Budget Unit Qty |
| Earned Hours | Calculated | Number | Shows the number of labour hours earned (merited) based on the work produced to date for that cost code. |
Revised Budget Unit Quantity |
| Projected Hours at Completion | Calculated | Number | Shows the estimated labour hours needed to complete production for the cost code based on the work produced to date. | Timesheet Hours Divide (/) % Complete Production |
| % Complete Production | Calculated | Percent | Shows the percentage of the production quantity has been installed to date of the current budgeted production quantity for the cost code. | Actual Qty Installed Divide (/) Revised Budgeted Production Qty |
| Production UOM | Source | n/a | Shows the UOM for the budgeted production quantity (i.e., for the cost code on the line item). | Source Category: Production UOM Source: Budgeted Production UOM Source Filtering: n/a |
| Revised Budgeted Production Rate | Calculated | Number | Shows the actual budgeted production rate based on labour hours and installed quantities to date. | Revised Budgeted Production Qty Divide (/) Revised Budget Unit Qty |
| Actual Production Rate | Calculated | Number | Shows the actual budgeted production rate based on labour hours and installed quantities to date. | Actual Qty Installed Divide (/) Timesheet Hours |
| Variance Production Rate | Calculated | Number | Shows the difference between the current budgeted production rate and the actual production rate. A positive number indicates you are performing faster than expected. A negative number indicates you are performing slower than expected. | Actual Production Rate Subtract (-) Revised Budgeted Production Rate |
1 The 'Labor Productivity Cost' budget view is only available to customers using Procore's Resource Tracking tools. However, the 'Timesheet Hours' column can be added to other budget views. To learn how to add the column, see Can we import our third-party timecard entries to work with the 'Timesheet Hours' column in Procore's Budget tool?
Create a New Budget View
Things to Consider
-
Required User Permissions:
-
'Admin' on the Company Admin tool.
-
-
Additional Information:
-
To set up a budget view for real-time labour productivity, see Resource Tracking and Project Financials: Setup Guide.
-
To set up a labour productivity cost budget view, see Set Up the Procore Labour Productivity Cost Budget View.
-
Any user with 'Read Only' permission or higher on the Budget tool has access permission to apply the view to a project's budget. See Apply the View, Snapshot, Group, and Filter Options on a Budget or Forecasting View.
-
- For companies using the ERP Integrations tool:
- If your company account is using the ERP Integrations tool, Procore automatically provides you with a budget view for your Integrated ERP System. See Which ERP integrations are supported by Procore? for details about your specific ERP connector.
- Any custom budget views that you create for an ERP Integration must contain all of the required ERP data columns. This ensures that Procore can send the required budget data to the company's ERP Integrations tool for acceptance for export to the integrated ERP system by an Accounting Approver. See Send a Budget to ERP Integrations for Accounting Acceptance.
- Required User Permission:
- To add or edit a budget view, 'Admin' on the Company Admin tool.
Note: Your company's Procore account must be using Procore's Project Financials and Resource Tracking tools.
- To add or edit a budget view, 'Admin' on the Company Admin tool.
- Navigate to the Company Admin tool.
- Under Tool Settings, click Budget.
- Click Set Up New Budget View.

- Under Standard Views, highlight Procore Labour Productivity Cost.
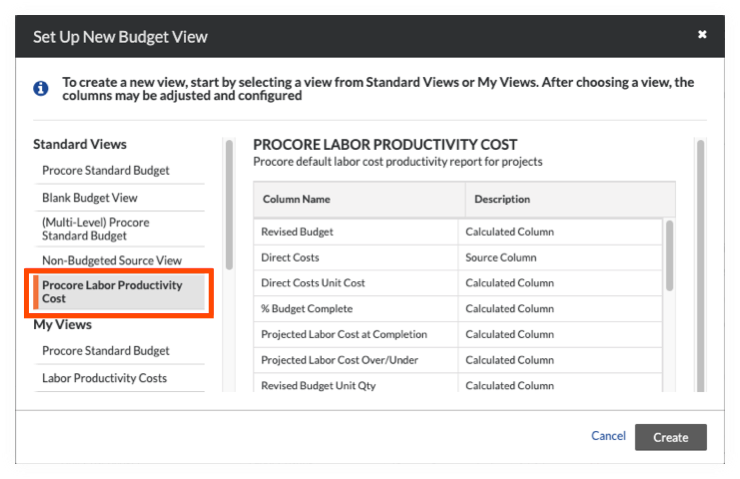
- Click Create.
- Name your view as follows:
- View Name. Enter a name for your new view. In this example, we named it: Labour Productivity Cost
- View Description. Enter a description for your view. In this example, we entered: Recommended view for labour cost productivity report
- Click Configure Columns. This opens the Configure Columns window pictured below. From this point, continue with the next step to Add the Equipment Time Column.
Add Equipment Time Column
Things to Consider
-
Required User Permissions:
-
'Admin' on the Company Admin tool.
-
-
Additional Information:
-
To set up a budget view for real-time labour productivity, see Resource Tracking and Project Financials: Setup Guide.
-
To set up a labour productivity cost budget view, see Set Up the Procore Labour Productivity Cost Budget View.
-
Any user with 'Read Only' permission or higher on the Budget tool has access permission to apply the view to a project's budget. See Apply the View, Snapshot, Group, and Filter Options on a Budget or Forecasting View.
-
-
For companies using the
ERP Integrations tool:-
If your company account is using the ERP Integrations tool, Procore automatically provides you with a budget view for your Integrated ERP System. See Which ERP integrations are supported by Procore? for details about your specific ERP connector.
-
Any custom budget views that you create for an ERP Integration must contain all of the required ERP data columns. This ensures that Procore can send the required budget data to the company's ERP Integrations tool for acceptance for export to the integrated ERP system by an Accounting Approver. See Send a Budget to ERP Integrations for Accounting Acceptance.
-
| Steps from the Configure Columns window… | Settings |
|---|---|
|
 |
Preview the Budget
Assign the Budget View to a Procore Project
After previewing your budget view and determining that it suits your business needs, you can assign it one or more Procore projects.
-
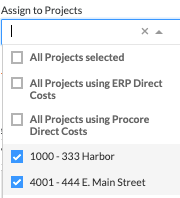
- Place a checkmark in the box next to one or more of the following options:
- All Projects Selected. This assigns the new budget view all of your Procore projects.
- All Projects Using ERP Direct Costs. This assigns the new budget view to projects using the ERP Direct Costs budget view.
- All Projects Using Procore Direct Costs. This assigns the new budget view to projects using the project level Direct Costs tool.
- [Individual Projects]. This assigns the new budget view to only the project(s) that you select.
- Click Done.
Apply the Budget View to your Budget
Navigate to the project's Budget tool. Then click the Budget, Budget Details, or Project Snapshot Status tab and select an option from the View drop-down menu. To add views to this menu, see Assign a Budget View to a Project.

Note
-
Procore offers company accounts several standard budget views. See What are Procore's standard budget views?
-
Your company can create custom budget views or modify existing views. For details, see Set up a New Budget View.
Generate and Print QR Codes
Things to Consider
-
Company Equipment Required User Permissions
-
Project Equipment Required User Permissions
-
QR Codes must be scanned with QR reader for the Equipment tool in the Procore mobile app:
Steps
Print a Single QR Code
- Navigate to the company or project's Equipment tool.
- Hover over the equipment record and click the QR code icon.
- To download a CSV and create your QR codes outside of Procore, click Download CSV.
OR
Select the 'Page Size' and 'Format Options'.- Click Print.
- In the Print window, click Print.
Bulk Print QR Codes
- Navigate to the company or project's Equipment tool.
- Mark the checkboxes for the equipment records you want to generate QR codes for.
- Click the QR code icon.
- To download a CSV and create your QR codes outside of Procore, click Download CSV.
OR
Select the 'Page Size' and 'Format Options'.- Click Print.
- In the Print window, click Print.
View Equipment Details (Web)
Scan Equipment QR Codes (iOS)
Things to Consider
-
QR Codes must be scanned with QR reader for the Equipment tool in the Procore mobile app.
-
You must give the Procore mobile app permission to access the camera on your mobile device.
-
If Location Services are enabled on your mobile device, the GPS location of your mobile device is used to update the location of the equipment.
Steps
-
Navigate to the Equipment tool using the Procore app on an iOS mobile device.
-
Tap the QR code
icon. -
Point your camera toward the QR code to automatically scan it and show the equipment details.
-
Optional: Continue your workflow by taking the following actions:
View Equipment Details (iOS)
Scan Equipment QR Codes (Android)
Things to Consider
-
QR Codes must be scanned with QR reader for the Equipment tool in the Procore mobile app.
-
You must give the Procore mobile app permission to access the camera on your mobile device.
-
If Location Services are enabled on your mobile device, the GPS location of your mobile device is used to update the location of the equipment.
Steps
-
Navigate to the Equipment tool using the Procore app on an Android mobile device.
-
Tap the QR code
icon. -
Point your camera toward the QR code to scan it and show the equipment details.
-
Optional: Continue your workflow by taking the following actions: