Add 3D Model Takeoffs
Objective
To add takeoffs to 3D models in a project's Estimating tool.
Background
A takeoff extracts quantities from a drawing or model and associates with items in your cost catalog to create estimates. Using the Takeoffs tab in Procore's Estimating tool, can add and manage a wide variety of takeoffs for different trades. As you might have both drawings and models on a project, you can use a combination of takeoffs from 2D drawings and 3D models to create estimates. This documentation shows the steps to perform takeoffs from 3D models.
Things to Consider
- Required User Permissions
- The following quantities are available for 3D takeoffs at this time: Count, Linear, Area and Volume.
- You can add additional 2D takeoffs to 3D takeoffs as needed. See Add Takeoffs.
- 3D takeoffs have a model
 icon next to them in the Takeoffs list.
 - You can use assemblies to create more detailed estimates from the model. See Create Assemblies for a Cost Catalogue.
- Navisworks is not required.
Prerequisites
- Your organisation must have the Procore BIM product, since this feature uses the model viewer from the Models tool.
- Revit® files must exist in the project's Documents tool. See Upload Files or Folders to the Project Level Documents Tool.
Steps
- Navigate to the project's Estimating tool on app.procore.com.
Note: The Estimating tool automatically opens to the Takeoff page. - Click the drawing drop-down menu.

- Click the Models tab.
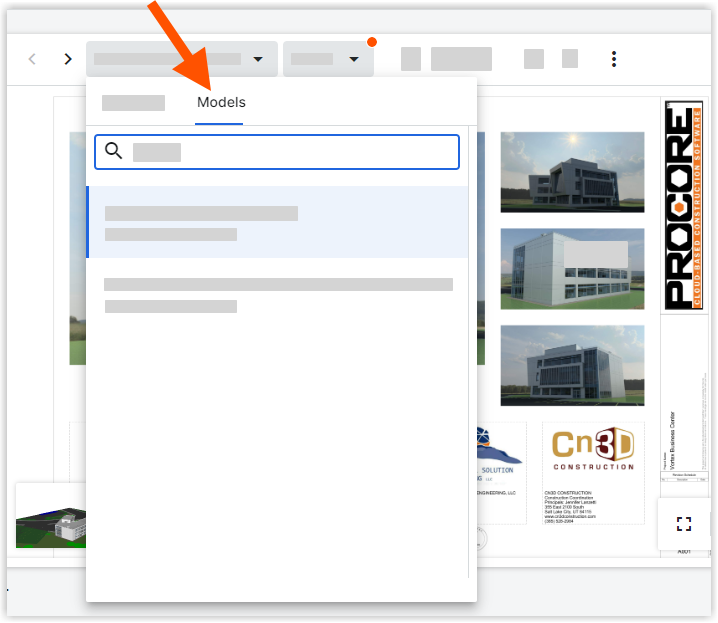
Note: This pulls model files from the project's Documents tool. See Upload Files or Folders to the Project Level Documents Tool. - Click the model you want to add a takeoff for.
This opens a 'Model Objects' panel and viewer for the model.- If you want to switch between the 2D drawing and 3D model at any point, click the drawing thumbnail at the bottom left of the viewer.
- The following tools are available:
 Default
Click to navigate the model from the default camera view. Fly
Fly
Click to navigate the model from the camera view at varying velocities. Orbit
Orbit
Click to rotate the camera from a fixed point. X-Ray
X-Ray
Use X-Ray mode to easily isolate and view specific objects in a model without objects blocking your view. Measure
Click on two objects to automatically calculate the shortest distance between the two objects. Home
Home
Click to return to the Home viewpoint.
- If you right-click on an object in the model viewer or click the vertical ellipsis
 icon for the object in the panel, you can access the following options:
- Hide Object
- Isolate
- View Properties
- Zoom to Object
- Click the eye
 icon next to an object in the 'Model Objects' panel to hide or show an object.
- Select the objects you want to add quantities for. You can select objects in the model or in the 'Model Objects' panel.
- 'Available Quantities' will be shown for the object with the option to search for specific quantities and a filter option to show advanced quantities.
- Click Takeoff for the relevant quantity.
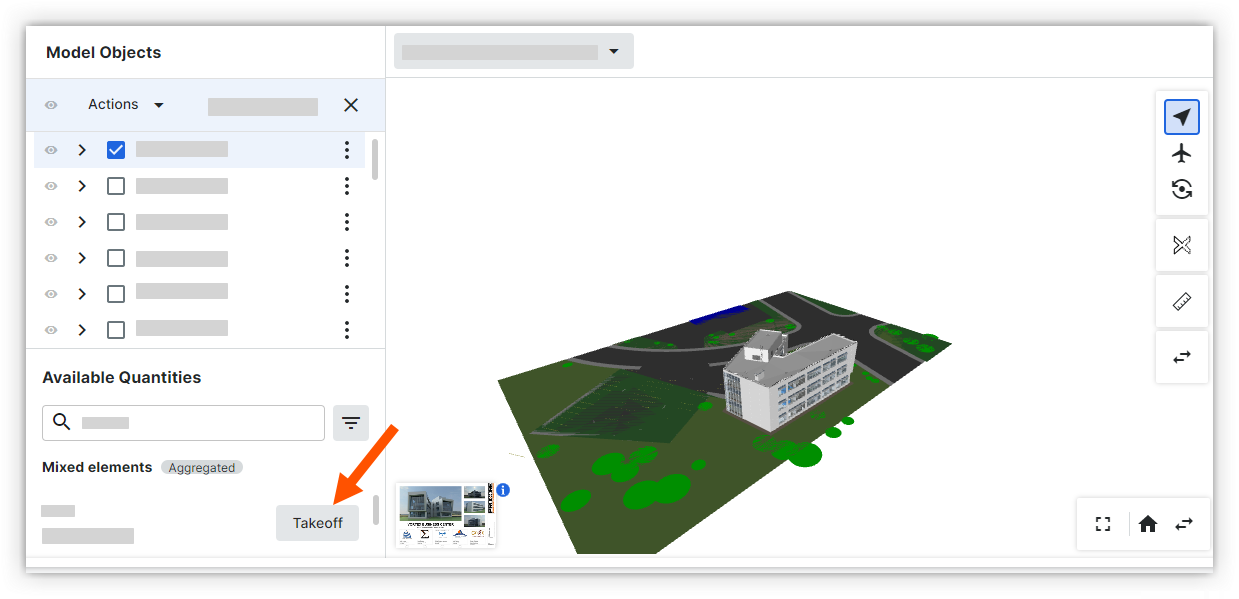
- Select a takeoff layer to add the quantity to.
OR
If you want to add the takeoff as a new layer, click Create New Takeoff Layer. See Add Takeoffs. - The quantity of the selected objects is automatically added to the takeoff layer.