(Beta) Configure a Head Contract's Advanced Settings
Objective
To update advanced settings for a head contract using the controls in the Head Contracts tool's Advanced Settings tab.
Background
If you are a user with 'Admin' level permissions on the Head Contracts tool, the steps below show you how to edit advanced settings for the project's head contract. This includes choosing an accounting method for the Schedule of Values (SOV), enabling financial markup, owner progress claim settings, comments settings and payment settings. In addition to these Advanced Settings, additional contract configuration settings are on the tool's Configure Settings page. See Configure Settings: Head Contracts.
Things to Consider
- Required User Permissions:
- 'Admin' level permissions on the project's Head Contracts tool.
- Additional Information:
- Additional contract configuration settings are on the tool's Configure Settings page. See Configure Settings: Head Contracts.
Prerequisites
Steps
Edit the Advanced Settings
- Navigate to the project's Head Contracts tool.
- Locate the head contract to work with. Then click its Number link.
- Click the Edit Advanced Settings button.
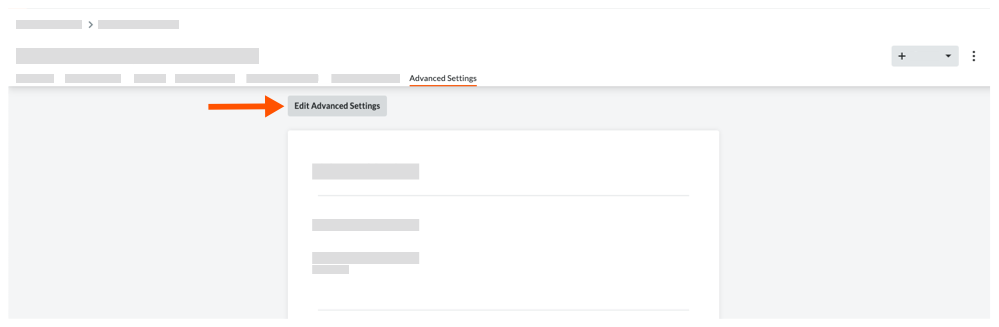
- Choose from these options:
Turn Financial Markup ON and OFF on a Contract
You can turn the Financials Markups tab ON and OFF on an individual head contract. Procore's default setting is ON. To learn how to use this feature, see Add Financial Markup to Head Contract Variations.
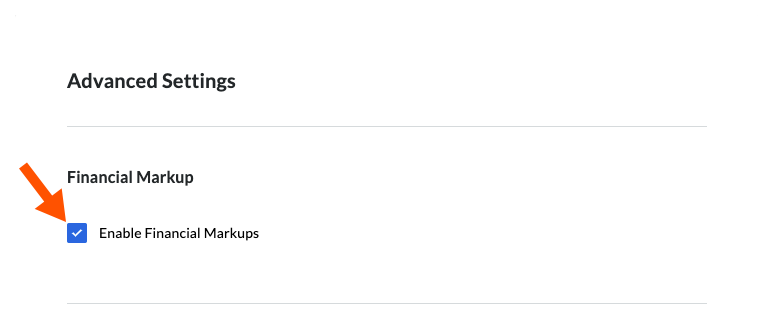
Under the 'Financial Markup' section, do the following:
- To turn the Financials Markup tab ON, place a checkmark in the Enable Financials Markup box.
OR - To turn the Financials Markup tab OFF, remove the checkmark from the Enable Financials Markup box.
If this is the only setting you want to change, click Save. Otherwise, continue with the next step.
Set Up Head Contract Progress Claim on a Contract
If you are planning to generate progress claims to send to a project's owner or a client for the work your team performs, you use the controls in this section to set up the owner progress claim feature for a head contract.
- Scroll to the 'Head Contract Progress Claim' section.
- Choose to enable or disable the following options:
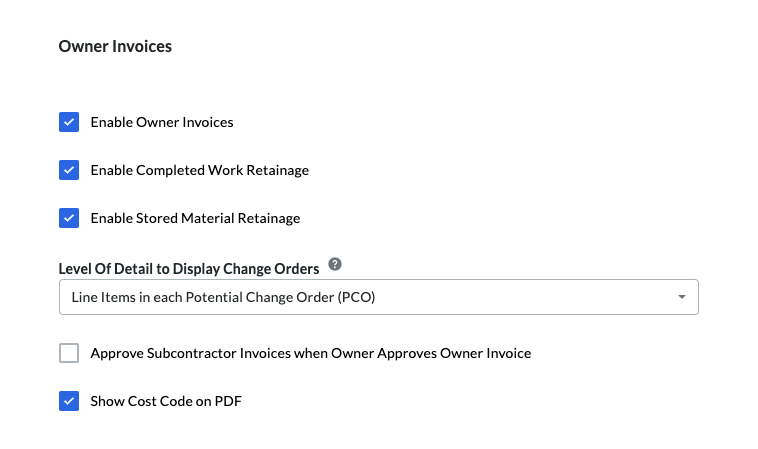
- Enable Head Contract Progress Claim. To turn the owner progress claim feature ON for this contract, place a checkmark in this box. ON is the default setting. To turn this feature OFF, remove the checkmark.
- Enable Completed Work Retention. To turn the completed work retention feature on, place a checkmark in this box. ON is the default setting. To turn this feature OFF, remove the checkmark.
- Enable Stored Material Retention. To turn the stored material retention feature on, place a checkmark in this box. ON is the default setting. To turn this feature OFF, remove the checkmark.
- Level of Detail to Display Variations. This setting determines how Procore displays variations in the 'Detail' tab of the head contract. Your options include:
- Line items in each Potential Variation. This is the default setting. This setting lists all of the line items for all potential variations related to the head contract.
- Head Contract Variation. This selection lists only the variations related to the head contract.
- Potential Variation. This selection lists only the potential variations related to the head contract.
- Approve Subcontractor Progress Claims when Owner Approves Head Contract Progress Claim. Place a checkmark in this box so that once an owner approves an owner progress claim, the subcontractor progress claim is also approved. This function is only enabled when you choose to pre-fill your head contract progress claim with data from your project's subcontractor progress claims. To learn more about pre-filling progress claims, see Create Head Contract Progress Claim.
- Show Cost Code on PDF. Place a checkmark in this box to show cost codes on the PDF. There is no cost code column in the Configurable PDF tab, but cost codes will show in headers if grouped by cost code.
If these are the only settings you want to change, click Save. Otherwise, continue with the next step.
Turn Payments Received ON and OFF on a Contract
You can turn the Payments Received tab ON and OFF on an individual head contract. Procore's default setting in ON. To learn how to use this feature, see Add Financial Markup to Head Contract Variations.
- Scroll to the 'Payments Received' section.
- Choose from these options:
- To turn the 'Payments Received' tab ON, place a checkmark in the Enable Payments box. ON is the default setting.
ON - To turn the 'Payments Received' tab OFF, place a checkmark in the Enable Payments box.
- To turn the 'Payments Received' tab ON, place a checkmark in the Enable Payments box. ON is the default setting.
If these are the only settings you want to change, click Save.
Set the Accounting Method on a Head Contract
Before users start adding line items to a head contract, you can choose the accounting method that to use. The accounting method cannot be changed after line items are created.
- Scroll to the 'Schedule of Values' section.
- Choose the accounting method for the contract:

- Amount Based
Choose this method to enter a lump sum amount for a line item on a Schedule of Values. Amount Based is Procore's default setting for contracts. - Unit/Quantity Based
Choose this method when ordering materials in quantity. With this method, users enter a quantity and unit price for the line item on the Schedule of Values and Procore automatically calculates the total for the line item for you.
- Amount Based
- Click Save.