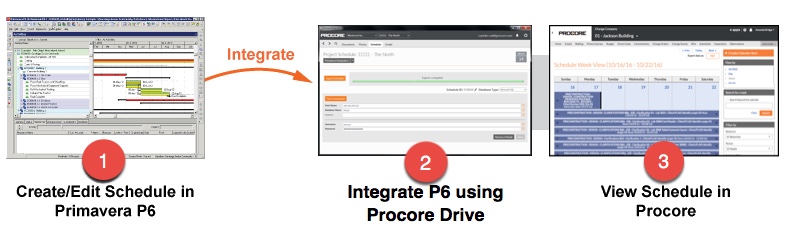
Integrate a Primavera P6 Program using Procore Drive
NOTE: This page is linked in the Procore web app
Location: https://app.procore.com/1004955/proj...l_distribution
- Schedule > Schedule Settings > Email Distribution > Project Schedule Email
Objective
To integrate a project program from Oracle's Primavera P6 Professional Project Management software to your project in Procore.
Overview Diagram
Things to Consider
- Required User Permissions:
- 'Admin' permissions on the Program tool in Procore.
- Additional Information:
- This article provides steps to integrate a Primavera P6 program with a Procore project. Oracle Primavera Cloud does NOT integrate with Procore Drive.
- When you integrate a Primavera P6 program with its associated project in Procore, anyone with ‘Read Only’ or higher level permissions on the project’s Program tool will be able to view your P6 program directly in Procore.
- Your program cannot be changed directly in Procore. Any changes to your P6 program must be performed using Oracle’s Primavera P6 Professional Project Management software.
- You can only link a single program to a Procore project. When a new version of the program becomes available, you must upload it to Procore Drive to overwrite the previous version. To do this, you must export the program by clicking the Export Program button in Procore Drive.
Note: Each time a file is uploaded a file is saved in the Documents tool for versioning history. - The following items will be imported through the Primavera P6 integration:
- Work Breakdown Program (WBS)
- Activity Names
- Activity ID
- Baseline Start
Note: Only one Baseline Start is supported in Procore. - Baseline Finish
Note: Only one Baseline Finish is supported in Procore. - Start
- Finish
- Duration
- % Complete (Duration, Physical or Units based on settings)
- Predecessors, Successors
- Notes
- Resources, Resource Assignments
Note: The WBS and Activities in Procore will appear as a hierarchy of tasks.
Prerequisites
Install the Current Version of Procore Drive
- Install the latest version of Procore Drive. If you do not have the most recently published version, please see Procore Drive Set Up Guide.
Obtain the Appropriate Database Credentials
- Obtain the appropriate database credentials for the private user (i.e. privuser) of the Microsoft SQL or Oracle database. Typically, the default private username is 'privuser.' However, some organisations change this. See your organisation's Database Administrator for the credentials.
Note: Any Oracle user account that has at least read only access to the relevant P6 program information you want to integrate into Procore will work to use as the username and password you enter into Procore Drive.
Steps
Configure the Project Level Program Tool for Primavera P6
- Navigate to the project's Program tool in Procore's web application.
- Click the Configure Settings
 icon.
icon. - Click the Program Settings page.
- Set the Primavera Project ID, found in the File > Open window of the Primavera P6 project.
Note: This is the Schedule ID number that Primavera P6 uses to identify a specific project schedule.
At any time you can change the Project ID or Schedule ID to pull in a different P6 schedule via Procore Drive.

- Scroll down and click Update to save your changes.
Configure the P6 Database Server Settings in Procore Drive
- Open Procore Drive on your computer.
- Select your company and project from the drop-down menus.
- Select the Program tool.
- Verify that Primavera Integration is selected under your project name.
Note: Any Oracle or SQL Server user account that has at least read-only access to the relevant P6 program information you want to integrate into Procore will work to use as the username and password you enter into Procore Drive. - Verify the Program ID.
Note: This is the Program ID number that Primavera P6 uses to identify a specific project program. - Select the Database Type.
- Follow the appropriate instructions below, depending on your database type:
Microsoft SQL Database Instructions
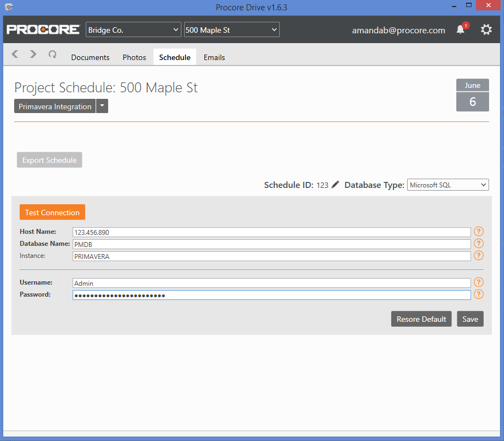
- Host Name: Enter the IP address (e.g., 184.106.123.123) or computer name (e.g. primavera-p6-2) of the machine where Primavera P6 is currently installed. If Procore Drive is installed on the database server itself, you can enter 'localhost' or the computer's name.
Tip: To find your computer name, go to Start > Control Panel > System. Under the Computer Name section, copy and paste the value for 'Full Computer name' (do not include any ending period). - Database Name: Enter the name of the SQL database for Primavera P6. (e.g. PMDB)
Tip: To find this value, go to the login prompt for Microsoft SQL Primavera P6. The value next to Database is what you will enter. - Instance: If Primavera 6 is locally installed on the machine (default), leave this field blank. If it’s installed on a network server, specify the instance’s name on the network. (e.g. PRIMAVERA).
- Database Credentials: Enter your database credentials. Procore must use the login credentials for your 'privuser' in order to access the required data from the P6 database.
- Username: Enter the name of the private user. The default value is 'privuser'.
- Password: Enter the matching password.
Note: Any Oracle or SQL Server user account that has at least read-only access to the relevant P6 program information you want to integrate into Procore will work to use as the username and password you enter into Procore Drive.
- Click the Test Connection button to validate that the provided database information is correct. If it is not correct, please check your credentials and try again.
- Once the connection is validated, click the Save button to save your changes.
- Click the Export Program button to upload and apply the project program to your project in Procore. It will take a few minutes for your program to finish the upload process.
- After you see a 'Export complete' message, log in to Procore and verify that you can see your program and all of its data under your project’s Program tool.
Oracle Database Instructions
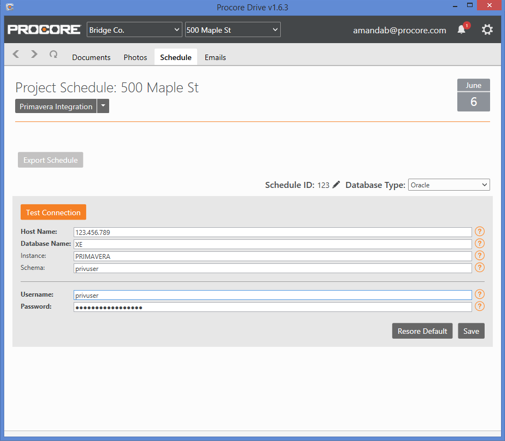
- Hostname: Enter the IP address (e.g. 184.106.123.123) or computer name (e.g. primavera-p6-2) of the machine where Primavera P6 is currently installed. If Procore Drive is installed on the database server itself, you can enter 'localhost' or the computer's name.
Tip: To find your computer name, go to Start > Control Panel > System. Under the Computer Name section, copy and paste the value for 'Full Computer name' (do not include any ending period). - Database Name: Enter the database’s Oracle Connection String for this value. (e.g. XE)
Tip: To find this value, go to the login prompt for Oracle Primavera P6. The value next to Database is what you'll want to enter. - Instance: If Primavera P6 is locally installed on the machine (default), leave this field blank. If it’s installed on a network server, specify the instance’s name on the network (e.g. PRIMAVERA).
- Schema: Enter the database schema name. (e.g. privuser)
Note: Any Oracle or SQL Server user account that has at least read-only access to the relevant P6 program information you want to integrate into Procore will work to use as the username and password you enter into Procore Drive. - Database Credentials: Enter your database credentials. Procore must use the login credentials for your ‘privuser’ in order to access the required data from the P6 database.
- Username: Enter the name of the private user. The default value is 'privuser'.
- Password: Enter the matching password.
- Click the Test Connection button to validate that the provided database information is correct. If it is not correct, please check your credentials and try again.
- Click the Save button to save your changes.
- Click the Export Program button to upload and apply the project program to your project in Procore. It will take a few minutes for your program to finish the upload process.
- After you see the 'Export complete' message, log in to Procore and verify that you can see your program and all of its data under your project’s Program tool.
SQLite Database Instructions
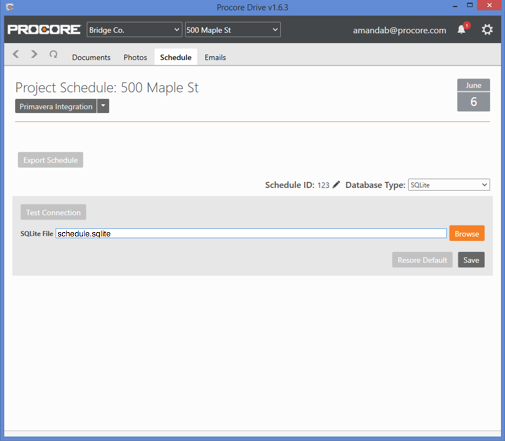
- Click Browse.
- Select your SQLite program from your computer.
- Click Save.
- After you see the 'Export complete' message, log in to Procore and verify that you can see your program and all of its data under your project’s Program tool.
Note: Any Oracle or SQL Server user account that has at least read-only access to the relevant P6 program information you want to integrate into Procore will work to use as the username and password you enter into Procore Drive.
Next Steps
- Navigate to the Project level Program tool in Procore's web application.
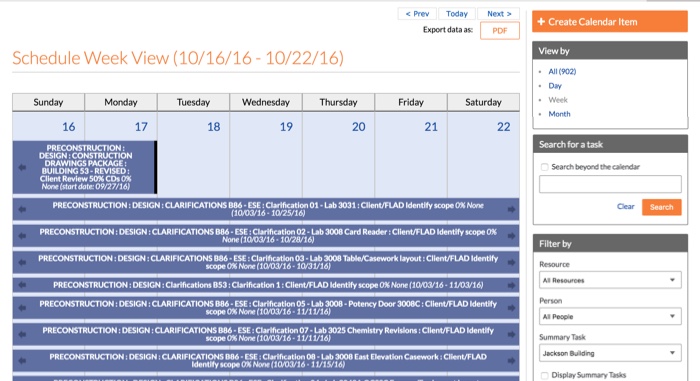
- Use the various 'View by' options to change how the information is displayed.
- See Schedule for more tutorials on actions you can perform on an integrated schedule.
Note: Any Oracle or SQL Server user account that has at least read-only access to the relevant P6 schedule information you want to integrate into Procore will work to use as the username and password you enter into Procore Drive.