Procore Support (en-au)

Configure Advanced Settings: Project Program

Objective

To set advanced preferences for the Project level Program tool in Procore.

Things to Consider

  • Required User Permissions:
    • 'Admin' level permissions on the project's Program tool.
      Note: To view or edit information on the Permissions Table page for the Program tool, 'Admin' permission to the project's Directory tool is also required.
  • Additional Information:
    • The latest date and time that a program was uploaded or updated will be displayed in the header of every page in the Program tool's settings page next to 'Last Modified'.

Video


Video content may not accurately reflect the current state of the system, and/or it may be out of date.

Steps

  1. Navigate to the project's Program tool.
  2. Click the Configure Settings icons-settings-gear.png icon.
  3. Click one of the following pages:
    • Update Program
    • Clear Program
    • Program Settings
    • Email Settings
    • Permissions Table
      Note: This page is only available to users who also have 'Admin' permission to the project's Directory tool.

Use the table of contents below to skip to the section you want to learn more about.

Update Program

update Current Program with New Schedule

Project programs cannot be edited in Procore. They must always be updated in the third-party software program (e.g., Microsoft Project, Asta PowerPoint, etc.) and then uploaded into Procore again. 

Important! Uploading a project program update overwrites the existing program and permanently removes the previous program's Change History from the system. 

  1. Click Overwrite Program in the right pane. 
  2. Under the Overwrite Current Program with New Program area, complete the following:
    • Click the Choose File button. 
    • Navigate to the program file on your computer or network. Then click Open
  3. Scroll to the bottom of the page and click Update.
    The 'Program Uploaded, processing should start soon' message appears. Your program is placed into a job queue and the system updates the program on a task-by-task basis. Depending on the number of jobs in the queue and the size of your project program, the overwrite process may take some time to complete. You can continue working in Procore during this process (Note: To confirm that your upload is complete, click the links in the View By menu to view the program changes). 
    Important! While the program is being updated, it is recommended that you do not attempt to upload another program update. Doing so will add a second job to the queue and jobs will be processed in the order they were uploaded into the system. 

Clear Current Program

  1. Click the Clear Program link to navigate to the Clear Program page. 
  2. Click Clear Program.
    Notes: This will permanently delete the program currently uploaded to the project and remove all schedule change history, along with any links between tasks and other Procore data. See Clear an Integrated Program.
    Any program files uploaded to the system generated folder in the Documents tool will still be available. 

Program Settings

Upload Project Program Files

  1. Select the Program Settings link on the right side of the page.
  2. Select the drop-down menu next to Program Data From.
  3. Click one of the following options:
    • File Upload via Procore Drive
    • File Upload via Procore Documents
      • ImportantEnter the exact or partial name of your program file in the "Program Filename Pattern" field. For example, you would enter "Construction Program.mpp" into this field. Uploaded files into documents matching this exact filename pattern will be automatically updated into the Program tool.
        • You can also utilise special characters to identify partial filename patterns. For example, if you prefix your program file with the date (e.g. 07-26-17_Construction Program .mpp), you can use the asterisk (*) symbol to denote that piece of the filename that will change. For example, you would enter *_Construction Program.mpp into the Program Filename Pattern field.
      • Tip! When multiple users are accessing the program file and you're making changes to the file from the Documents tool, it is recommended that you check out the file so the team members don't overwrite your program changes as you're uploading.
    • File Upload via Web Browser
    • Primavera P6 via Procore Drive

Project Tasks
project-tasks-schedule.png

  • Display Task names with their summary task names: Mark or remove the mark from this checkbox to change how each program task is displayed in the Program tool. Checking the box displays all of the summary tasks along with the task name that falls under it. Leaving the box unchecked simply displays the task name as displayed below.

  • Display Resource names on calendar: Mark the checkbox to turn on the display of resource names in tasks on the Week and Month calendar views.
  • Allow Program tasks to be updated via the Procore mobile app: Mark the checkbox to enable program task to be updated from a mobile device using the Procore mobile app.

Program Sidebar

  • Enable Calendar Item Creation: Mark the checkbox if you would like users with 'Standard' level permissions or above to create calendar items in addition to the integrated program. These calendar items can be published and visible to everyone on the team or they can be personal and only visible to the person creating them. See Create a Calendar Item.
  • Enable Filtering by Person: Mark the checkbox if you would like users with 'Read-only,' 'Standard,' or 'Admin' level permissions to be able to filter the calendar by a person associated with tasks. You may not want to enable this if your tasks are not assigned to users in Procore.

Email Settings

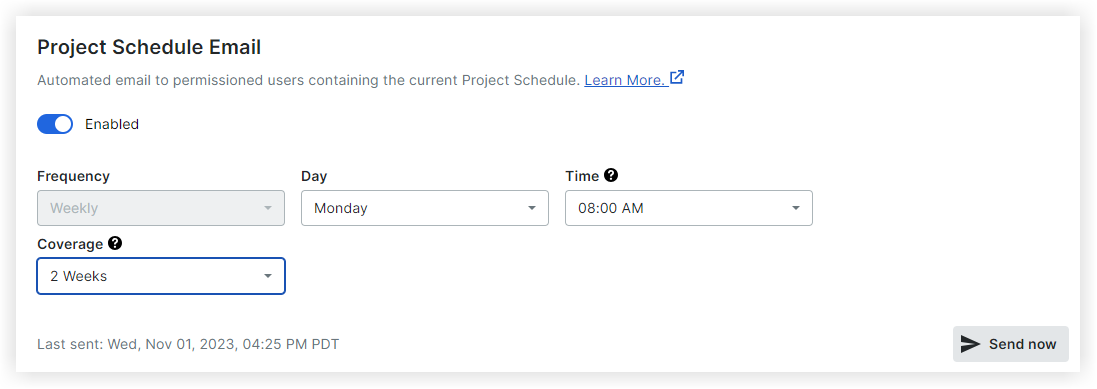
Weekly Project Program

weekly project schedule-schedule configuration.png

  1. Mark the checkbox next to 'Enable Weekly' to send weekly emails to specific users showing all upcoming program tasks on the project program. 
  2. Next to 'Settings', set when and how often the emails will be sent.
  3. The following action requires 'Admin' permission to the project's Directory tool.
    1. Navigate to the Permissions Table page.
    2. Select which users will receive emails by marking the checkbox(es) in the Weekly Project Email column. 
  4. Optional: If you want to send the weekly project program immediately, click Send Project Program Now on the Email Settings page.

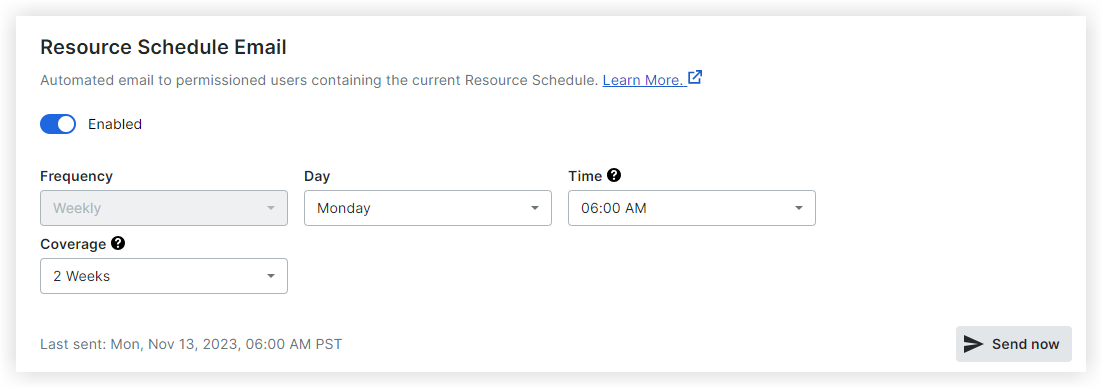
Weekly Resource Program

weekly resource schedule - schedule configurations.png

  1. Mark the tickbox next to 'Enable Weekly' to send weekly emails to specified users showing all upcoming tasks on the project program.
  2. Next to 'Settings', set when and how often the emails will be sent.
  3. The following action requires 'Admin' permission to the project's Directory tool.
    1. Navigate to the Permissions Table page.
    2. Select which users will receive emails by marking the checkbox(es) in the Weekly Resource Email column. 
    3. Select which Resource this individual will be assigned.
      Note: If a resource email is sent via Email Settings and a users resource is assigned to a program activity that is in that timeframe, the Resource email will be sent to that individual user.
  4. Optional: If you want to send the Weekly Resource Program email immediately, click Send Resource Program Now on the Email Settings page.

 weekly lookahead email

weekly-lookahead-email-settings.png

  1. Mark the tickbox next to 'Enable Weekly' to send weekly emails to specified users showing all upcoming tasks on the project program.
  2. Next to 'Settings', set when and how often the emails will be sent.
  3. The following action requires 'Admin' permission to the project's Directory tool.
    1. Navigate to the Permissions Table page.
    2. Select which users will receive emails by marking the checkbox(es) in the Weekly Lookahead Email column. 
    3. Select which resources this user will be assigned.
      Note: If a lookahead email is sent via Email Settings and a user's resource, company or the individual is assigned to a Lookahead program activity in the most recent Lookahead, the Lookahead email will be sent to that individual user.
  4. Optional: If you want to send the Weekly Lookahead Email immediately, click Send Lookahead Program Now on the Email Settings page.

Permissions Table

Note: This page is only available to users who also have 'Admin' permission to the project's Directory tool.

  1. Click Permissions Table in the right sidebar.
  2. Set each user's permission for the Program tool according to your preferences.  
    • check.png Access
  3. Choose which resource the user is associated with from the drop-down menu under the Resource column.
  4. Select which (if any) weekly emails they will receive. 
    Note: Edit when and how often these emails are sent out in the Email Settings page.
  5. For a list of what users can do at each permission level in the Program, see the Permissions Matrix.
  6. In the example screenshot below, the user has 'Read-only' level permissions and is receiving weekly project emails.
    schedule-weekly-emails.png