Create a Subcontractor Progress Claim for Release of Retention in the Invoicing Tool
Objective
To create a subcontractor progress claim for the release of retention as a final payment.
Background
In Procore, the term Retention refers to the practice of withholding of a portion of a contract amount until the work is deemed satisfactorily complete. The withheld amount is specified in an agreement between the contracting party (the party paying for the work) and a contracted party (the person or company performing the work). A common practice is to withhold 5-10% of a contract's total value until a milestone is reached. Then, the withheld amount can be released as a progress payment. When work is substantially complete, the withheld amount can be released.
Things to Consider
Prerequisites
Steps
- Navigate to the project's Commitment tool.
- Go to Commitment for the progress claim you want to distribute.
- Click the Invoicing tab.
- Choose from these options in the Subcontractor tab:
- To modify an existing progress claim, locate the 'Draft' progress claim to modify and click its Progress Claim # link to open it.
OR - To create a new progress claim, click Create > Create Progress Claim. Procore creates a new progress claim in the 'Draft' status.
- To modify an existing progress claim, locate the 'Draft' progress claim to modify and click its Progress Claim # link to open it.
- In the General tab of the progress claim, scroll to the Schedule of Values.
- In the Schedule of Values, locate the line item(s) to modify and scroll to the right of the page to view the retention columns.
- Enter the amount to release in the Total Retention Released column.
Example
Before data entry, the cumulative total amount withheld for each line item is shown in the Total Retention column. In line item 1, the Total Retention is $2,500.00. In line item 2, it is $1,250.00.

Enter the amount of retention to release:
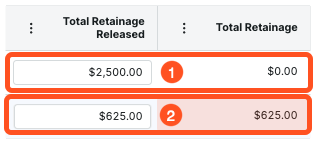
- To release all of the amount withheld, enter 100% of the Total Retention value. In line item 1, enter $2,500.00 to release the entire amount.
- To release half of the amount withheld, enter 50% of the Total Retention value. In line item 2, enter $625.00 to release 50% of the $1250.00 amount.
After data entry, Procore reduces the Total Retention value by the amount of your data entry:
- Update the amount of retention to release in each line item on the progress claim as needed.
- Click Save.
Procore saves the progress claim in its current status. A banner appears at the top of the screen to show the total amount of retention being released on the progress claim.Example
This is an example of the banner that appears to show the total amount of retention being released on the progress claim.

Tips
- Need to add attachments to the progress claim? Scroll to the Attachments card and click Attach Files to upload files from your computer or network.
- Want to download a PDF of the progress claim? See Export a Subcontractor Progress Claim.
- Need to create a payment program after the progress claim is approved? See Create a Payment Program.
- Using the DocuSign integration to collect signatures? To learn more, see Complete Subcontractor Progress Claims with DocuSign®.